Introduction
Every IoT system consists of the physical device (or the thing) which generally does the following: sense -> process -> transmit. What does it transmit to? Well, it generally transmits data to a cloud server, especially when the end-user is not in the vicinity of the device. There are various cloud service providers (AWS, Azure, Google Cloud, etc.). Even Arduino has come up with the Arduino IoT Cloud (we have already seen its interface with ESP32 in a previous article). And you need not choose one of these. You can set up your own server as well if you have the resources, knowledge, and bandwidth for that. In this article, though, as the title suggests, we will look at the usage of AWS as the cloud service provider.
AWS IoT
AWS IoT consists of a bunch of managed services that help you worry less about the ‘cloud server’ part, and focus more on the ‘device’ part. In fact, AWS IoT also provides solutions (like FreeRTOS) for the device software. But we can discuss them in another post; let’s focus on the cloud server part here.
AWS claims that AWS IoT can help you manage billions of devices, without the need to provision and manage servers. It has services for fleet management, data security, and data analysis. And being a part of AWS, it seamlessly integrates with other AWS services (Lambda, EC2, DynamoDB, RDS, S3, etc.).
Out of the various services available under AWS IoT, we will be looking at AWS IoT Core. This is the service that the devices directly connect to, for transmitting data. It allows for several communication protocols like MQTT, HTTPS, MQTT over WebSocket, and even LoRaWAN. And the communication is secured with end-to-end encryption and also authentication. Once the data is received by the IoT Core, you can define rules to transfer it forward to other services (like lambda), or take some action based on that data.
Objectives
We will keep the objectives of this article very modest. All we need to do is the following:
- Connect the ESP32 to AWS IoT Core
- Make the ESP32 publish messages to a topic (and view the received messages on the AWS IoT Console)
- Publish a message to a topic that the ESP32 has subscribed to and view the message received on the Serial Monitor
As you might have already understood, we will use the MQTT protocol.
Prerequisites
The following prerequisites are a must-have:
- An AWS Account: You won’t incur any charges, everything we cover in this article falls within the free tier
- ESP32 board (any standard board like DevKit, TTGO, ESP32-S, etc. will do)
- Arduino IDE, with ESP32 board added. You can download the IDE from here, and find instructions to add the ESP32 board here.
The following are good-to-have:
- Understanding of MQTT: You can use refer to the Wikipedia article. If I have to explain it in a single sentence, I’d invoke the analogy used by one of my professors: MQTT is like sharing information via a bulletin board (broker); publishers post to the board, subscribers read from the board.
- Past experience of programming with the Arduino IDE
Getting Started
AWS Setup
Creating a Thing
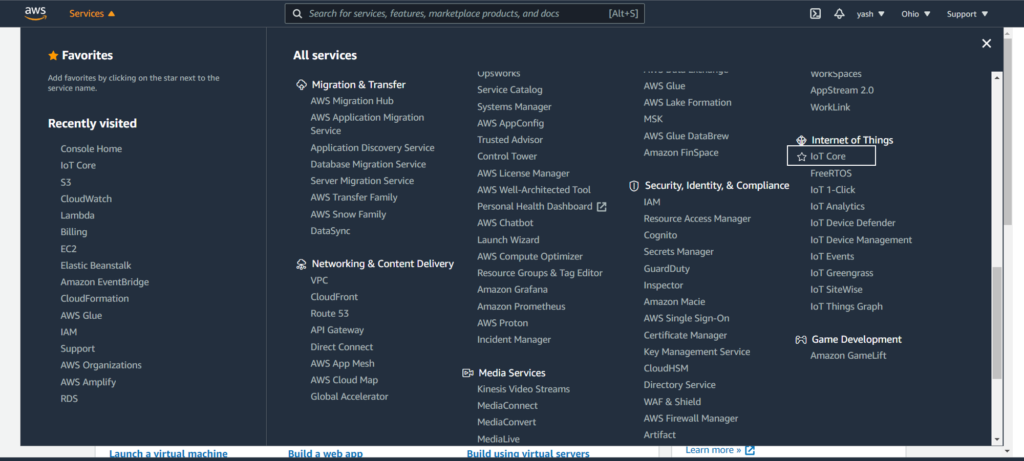
On the AWS Console, click on the ‘Services’ dropdown, and select IoT Core.
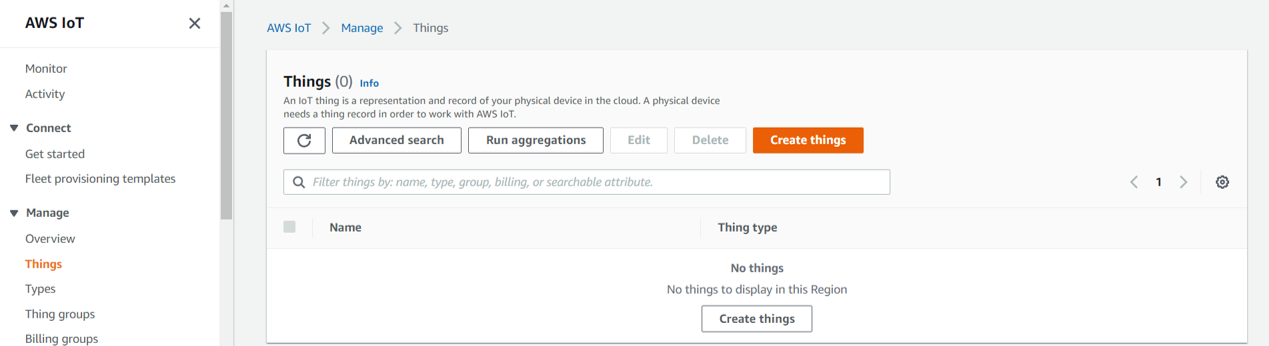
On the IoT Core homepage, you can refer to the menu on the left side. Over there, click on ‘Manage’, and select ‘Things’. On the page that opens up, click on ‘Create Things’.
A thing is a representation of our physical device on AWS. Once you click on ‘Create things’, you will be asked several questions, in the sequence below:
- Number of things to create – Click on ‘Create single thing’ for now, and click ‘Next’
- Thing name – Give it a suitable name, like esp32_0
- Leave out the optional additional configurations
- In the Device Shadow section, select ‘No shadow’ and click ‘Next’. We’ll cover device shadows in a separate article.
- For the Device Certificate section, click on the recommended ‘Auto-generate a new certificate’, and click on ‘Next’
- In the Policies section, do nothing for now (we will create and attach a policy to this thing in the immediate next section).
- Click on ‘Create thing’.
You will be shown a popup for downloading the certificates and private keys. It will look like this:
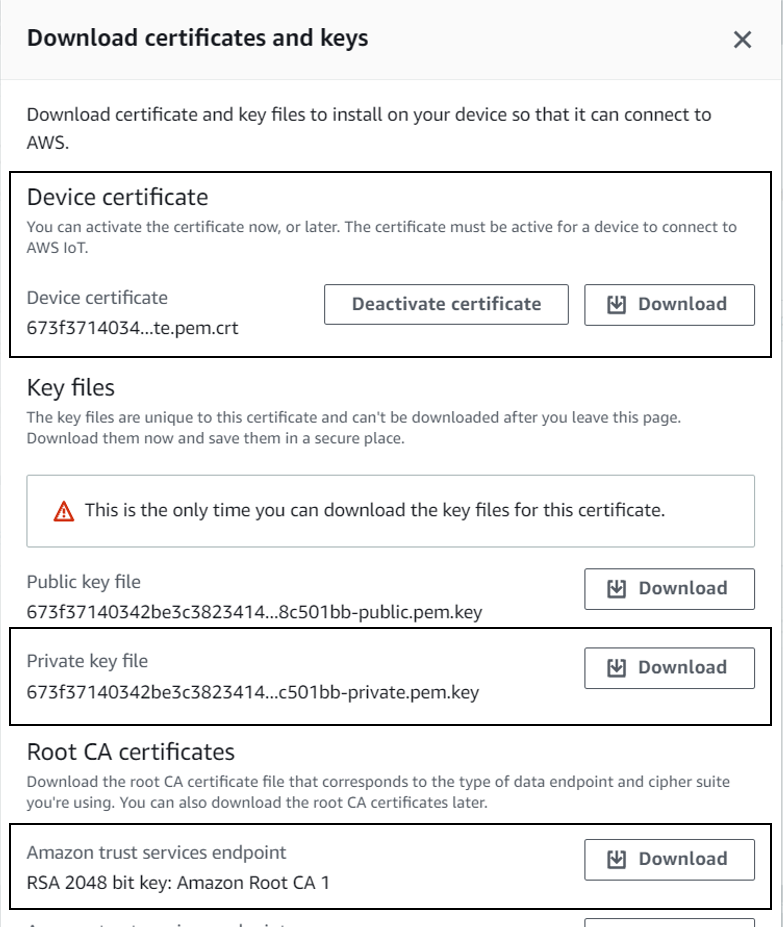
Out of these, you need to only download the highlighted files:
- Device Certificate –
- Private key file
- Amazon Root CA 1
All these will be required in the Arduino code of ESP32. Why are all these required? Well, a very good explanation is provided in this article: Understanding the AWS IoT Security Model. It is strongly recommended that you go through it, especially if you are interested in knowing what happens under the hood.
Once you’ve downloaded the required files, click ‘Done’. Congratulations!! Your thing is created.
Attaching a Policy
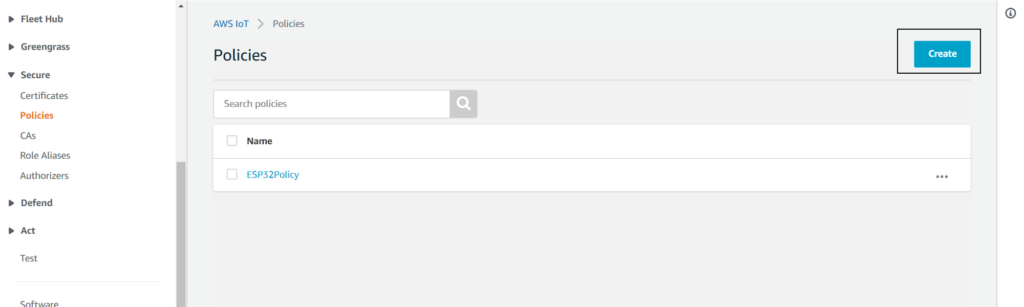
Now that we have a thing and its certificate created, we will attach a policy to the certificate, to limit the scope of actions for that thing. In the left-side menu, click on Secure -> Policies, and click on ‘Create’
In the form that opens up, give the policy a suitable name, like ESP32Policy, and then add the following statements:
- iot:Connect
- iot:Subscribe
- iot:Receive
- iot:Publish
For each statement, AWS will contain some placeholders, starting with ‘replaceWith’, which you need to fill. For instance, in place of ‘replaceWithAClientId’, enter the name of your thing. In place of ‘replaceWithATopicFilter’, add esp32/sub for the Subscribe and Receive statements, and esp32/pub for the Publish statements.
We essentially give our thing the permission to connect, subscribe to ‘esp32/sub’ topic, receive messages from ‘esp32/sub’ topic, and publish to ‘esp32/pub’ topic.
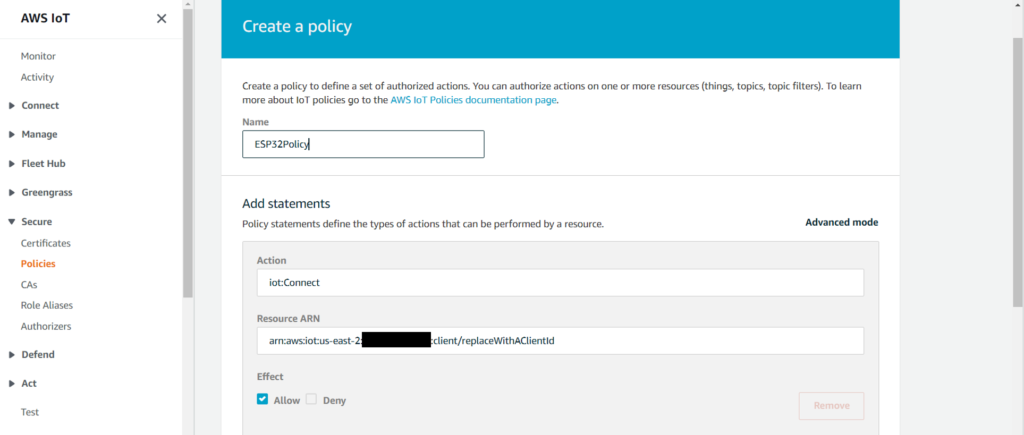
In the ‘Effect’ section, check ‘Allow’ for each statement. After adding the statements, click on ‘Create’.
The alternative method is to click on ‘Advanced mode’ and enter the policy document manually. It should look like this.
{
  "Version": "2012-10-17",
  "Statement": [
    {
      "Effect": "Allow",
      "Action": "iot:Connect",
      "Resource": "arn:aws:iot:REGION:12_DIGIT_ACCOUNT:client/esp32_0"
    },
    {
      "Effect": "Allow",
      "Action": "iot:Subscribe",
      "Resource": "arn:aws:iot:REGION:12_DIGIT_ACCOUNT:topicfilter/esp32/sub"
    },
    {
      "Effect": "Allow",
      "Action": "iot:Receive",
      "Resource": "arn:aws:iot:REGION:12_DIGIT_ACCOUNT:topic/esp32/sub"
    },
    {
      "Effect": "Allow",
      "Action": "iot:Publish",
      "Resource": "arn:aws:iot:REGION:12_DIGIT_ACCOUNT:topic/esp32/pub"
    }
  ]
}
Next, within the ‘Secure’ menu on the left, click on Certificates. Click on the certificate of your device, go to ‘Actions’, and click on ‘Attach policy’.
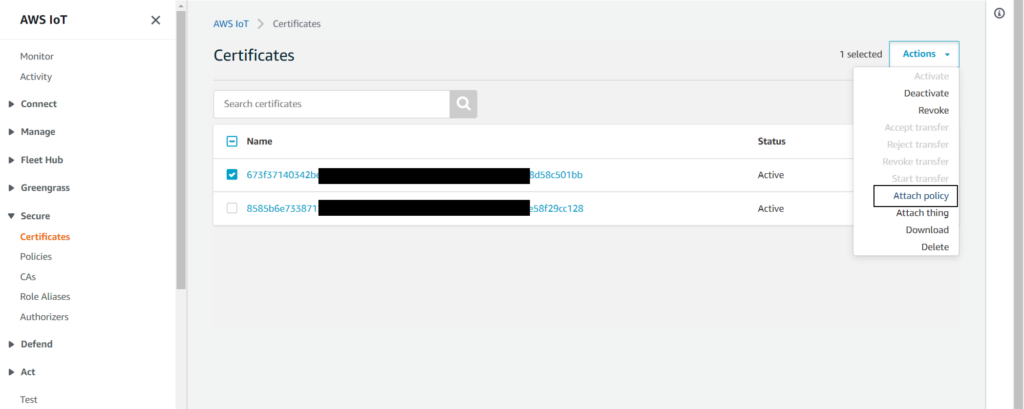
In the popup that opens up, choose the policy you just created, and click on ‘Attach’.
That’s it. The AWS Setup is done.
ESP32 Arduino Setup
Library Download
As the first step, download the MQTT library. Go to the library manager of Arduino and search for MQTT, and install the library by Joel Gaehwiler.

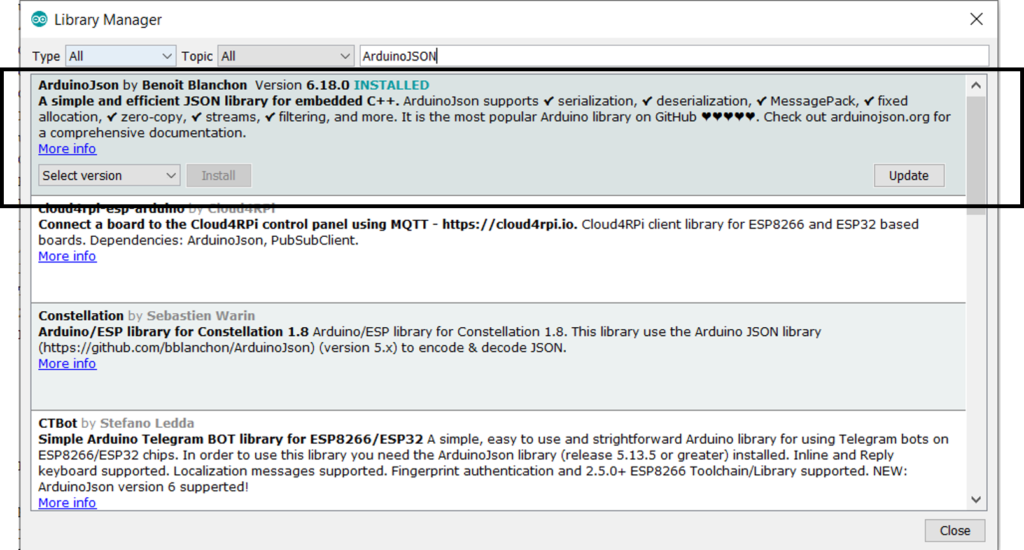
Next, you need to download the ArduinoJSON library. In the library manager, search for ArduinoJSON and install the library by Benoit Blanchon.
Code Changes
The code can be found on GitHub here: https://github.com/yash-sanghvi/ESP32/tree/master/AWS_IOT.
I’d like to mention that the code provided in a similar article on AWS forms the base on top of which this code was built. So special thanks to them.
In the code, you need to make changes in the config.h file.
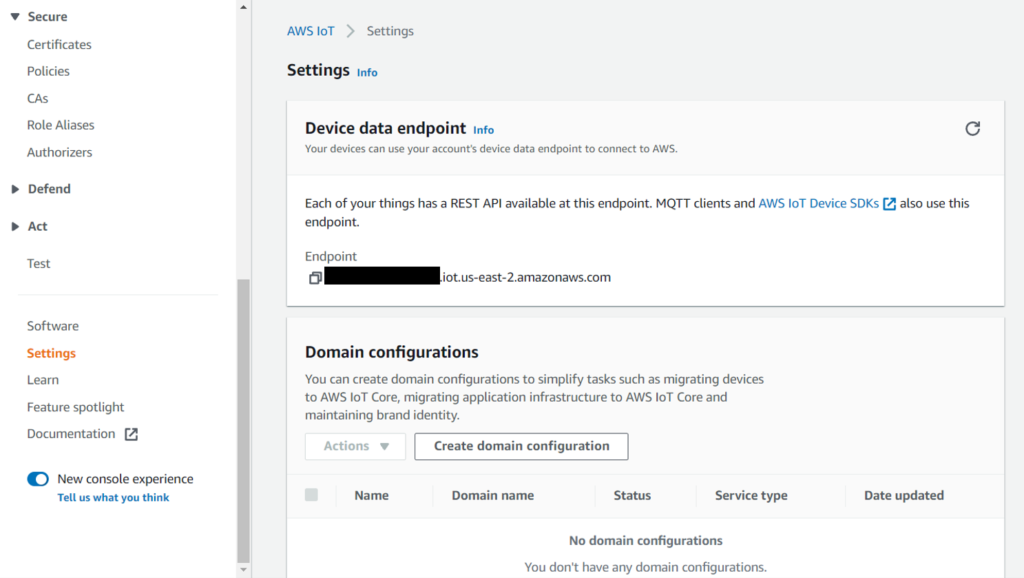
Enter your thing name, your WiFi SSID, and password. For the AWS_IOT_ENDPOINT, go to the AWS IoT Console, and from the left menu, click on Settings. You’ll find the endpoint there. Add it to the config.h file.
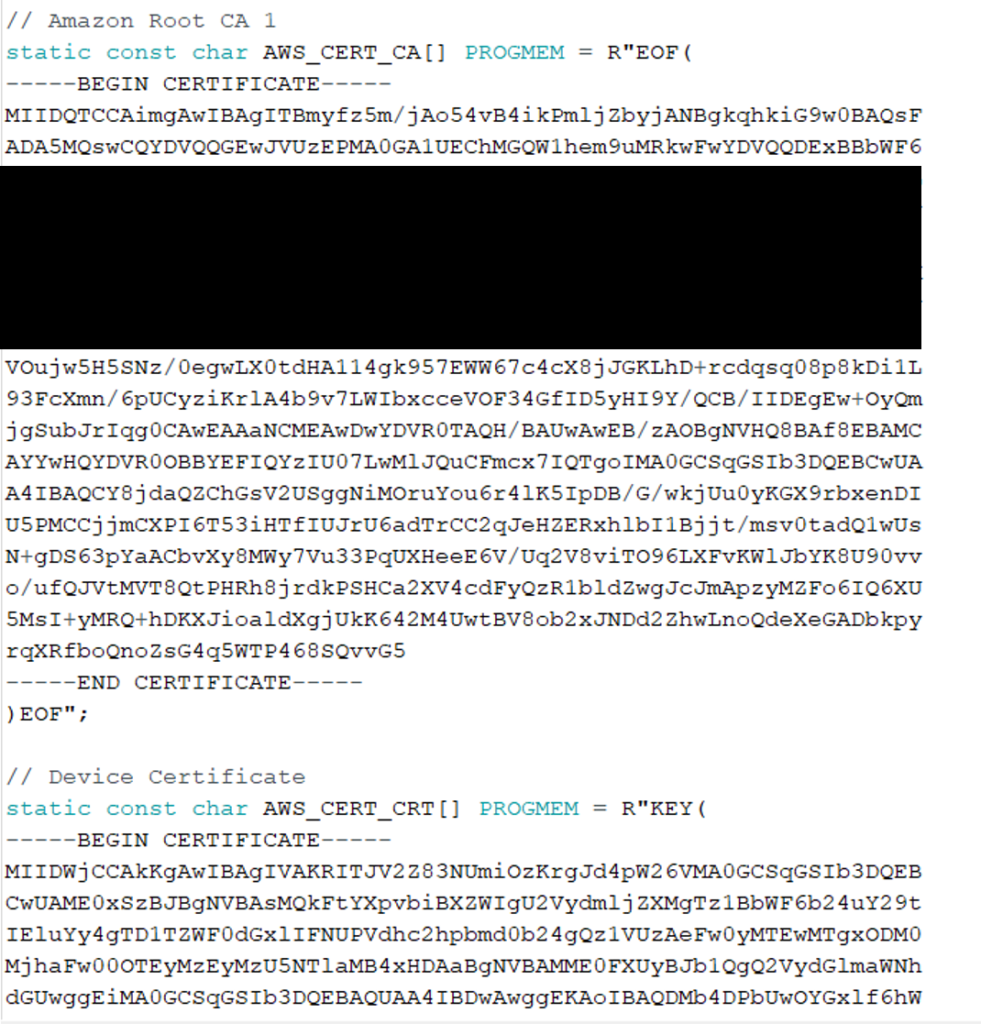
Next, open the downloaded certificates and key in a text editor, like Notepad, and copy the contents and paste in the specified locations in the file.
Brief Code Walkthrough
Let’s shift the focus to the .ino file now.
While the code is commented and largely self-explanatory, we will understand the flow. Within the setup, we configure the WiFi and the MQTT Clients and establish a connection between the ESP32 and AWS IoT. We also specify the function that should be invoked whenever a new message is received by the ESP32. All of this happens within the connectAWS() function.
In the loop, we publish a message to the ‘esp32/pub’ topic every 4 seconds. Note the mqtt_client.loop() that is called within the loop. This .loop() function maintains the connection of the client with the broker and also helps the client process incoming messages.
If you don’t have this mqtt_client.loop() line, you will be able to publish to ‘esp32/pub’, but won’t receive messages from ‘esp32/sub’ topic, because the incoming messages are processed only when this line is called. Therefore, this line should be called regularly.
Once your code is ready, program the ESP32, using the Upload button on the IDE.
Testing
In order to test, go to the AWS IoT Console, and from the left side menu, select ‘Test’.
The ‘MQTT test client’ portal will open up. Think of this like the broker interface. You can subscribe to a topic here, and also publish to a topic. Since our ESP32 is publishing to ‘esp32/pub’ topic, let us subscribe to that topic and see the incoming messages.
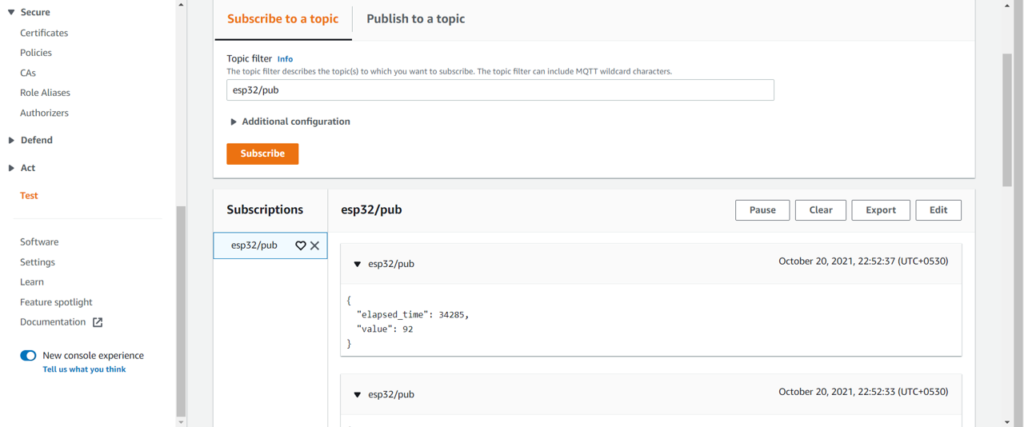
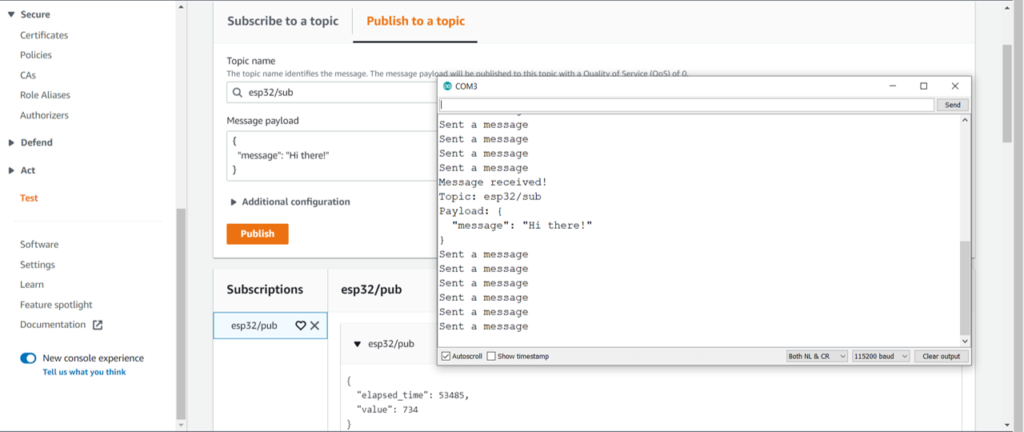
As you can see, we are receiving a message every 4 seconds, as expected. Next, go to the ‘Publish to a topic’ tab. Here, we will publish to the ‘esp32/sub’ topic, which our ESP32 has subscribed to. You may also want to keep the Serial Monitor of the Arduino IDE open, so that you can verify that the ESP32 indeed received the message.
That’s it. Congratulations!! You have successfully exchanged messages between ESP32 and AWS IoT Core. I hope you liked this post.
As the next step, you can learn how to define rules in AWS IoT Core and trigger a lambda using rules. You can find the tutorial for the same here.
For more tutorials on ESP32, check out https://iotespresso.com/category/esp32/. Also, you may find this course on ESP32 on Udemy to be quite helpful. Do check it out.
3 comments