Graphviz installation happens in two parts:
- Graphviz System Library
- Graphviz Python Library
Now, if you use the Anaconda environment, then the installation becomes quite straightforward. All you need to run is
conda install -c conda-forge python-graphvizThis will install both the system library and the python library. However, if you are looking for the pip install, method, then follow the steps below:
- Go to the downloads page of Graphviz, and download the executable for Windows (depending on your PC type, 64-bit or 32-bit).
- Run the .exe file. You will be asked whether you want to add graphviz to the system PATH. Either select the option for ‘ALL Users’ or ‘Current User’.
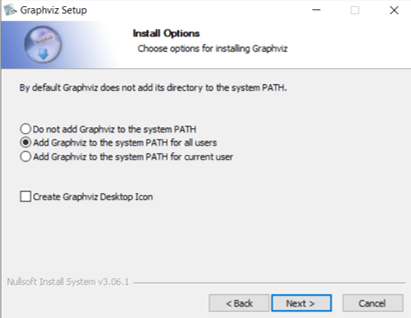
- Complete the installation. This takes care of the graphviz system library
- For the graphviz python library, run the following pip command:
pip install graphviz- Restart the IDE on which you wish to run Graphviz. If that doesn’t work, restart your PC and try again.
Note: If you just install the graphviz python library and not the system library, or if you don’t add the system library to the system PATH, you will get the following error on trying to run, say .visualize() on a dask dataframe:
ExecutableNotFound: failed to execute ['dot', '-Kdot', '-Tpng'], make sure the Graphviz executables are on your systems' PATHFor any more help related to graphviz installation, you can check out their forum post.
If after installing graphviz, you wish to customize the task graphs generated on clicking .visualize() in dask, then read this post to see how you can do that.
Found this post helpful? Then check out further posts on Python on iotespresso.com. Also, follow IoT Espresso on Twitter to get notified about every new post.
1 comment