Introduction – What we’ll create
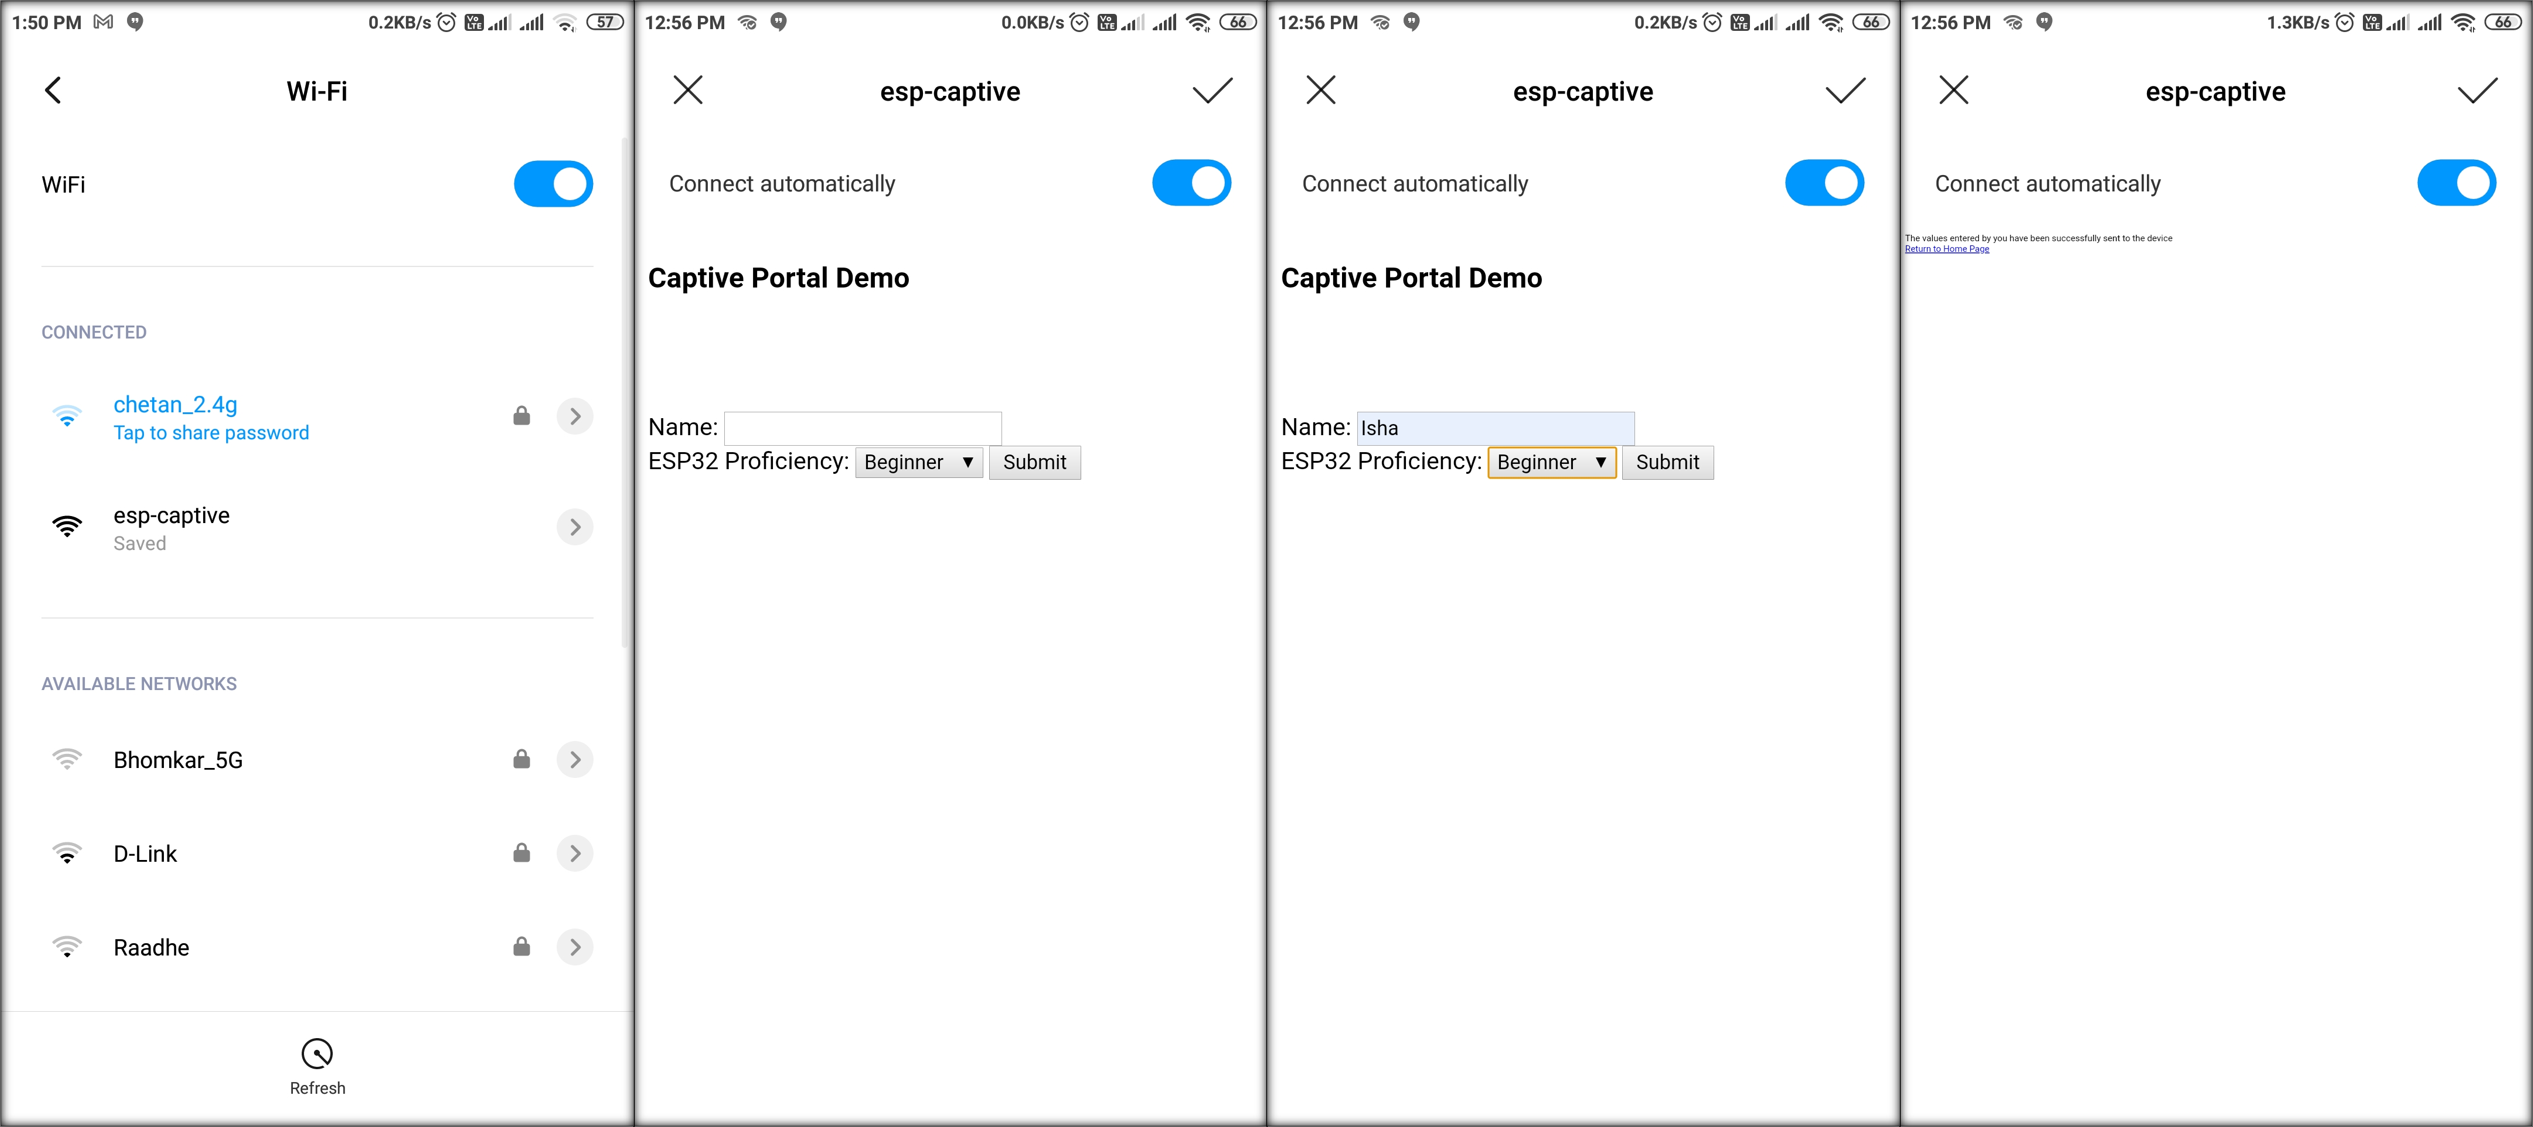
We will be creating a WiFi field using the ESP32, and as soon as you connect to that field using your mobile phone or laptop, a screen will popup asking for some information, which will be processed by ESP32. The screenshots below give a fair idea of what we’ll create:
What is a captive portal?
Have you ever tried to connect to the WiFi at a hotel or at an airport, and immediately, a webpage opened up, asking for your mobile number/ other details? This web page is called the captive portal. You are obliged to go through this webpage to gain further access, say, to the internet.
Now, ESP32 can also create its own Wi-Fi field in the Access Point mode. Of course, since the ESP32 itself is not connected to the internet, you will not be able to connect to the internet when you connect to ESP32’s Wi-Fi field. However, there are several other reasons for which you may want to connect to ESP32’s Wi-Fi field.
A common application is configuration. If your product is based on ESP32 and is going to be deployed at a remote location with unknown WiFi credentials, you can
- Configure your ESP32 to start off in the Access Point mode
- Make the user to connect to ESP32’s Wi-Fi field
- Show him/her a Captive Portal webpage as soon the connection is established, prompting the user to enter the Wi-Fi credentials
Once the user enters the Wi-Fi credentials, the ESP32 can switch from the Access Point mode to the station mode and connect to the available Wi-Fi network using the supplied credentials. This way you can deploy the ESP32 in any remote location without hard-coding the Wi-Fi credentials.
Required Libraries:
Now that the meaning and application of a Captive Portal is clear, let’s get practical. In this tutorial, we will walk through a very simple example, of taking input from the user using the Captive Portal. We will be using the Async Web Server Library for this purpose.
The Async Web Server library can be cloned/ downloaded from here: https://github.com/me-no-dev/ESPAsyncWebServer
This library, in turn, depends on the Async TCP library for ESP32, which can be cloned/ downloaded from here: https://github.com/me-no-dev/AsyncTCP
Please note that the latest version of the Async TCP library can have some compatibility issues with your Arduino core for ESP32, and you may have to download a prior version of this library. Please refer to this thread for more details: https://github.com/me-no-dev/ESPAsyncWebServer/issues/464
Code Walkthrough:
Alright, let’s begin the code walkthrough.
The code can be found on GitHub: https://github.com/yash-sanghvi/ESP32/blob/master/Captive_Portal/Captive_Portal.ino
We begin with the inclusion of the libraries:
#include <DNSServer.h>
#include <WiFi.h>
#include <AsyncTCP.h>
#include "ESPAsyncWebServer.h"
Next, we define some global variables:
DNSServer dnsServer;
AsyncWebServer server(80);

String user_name;
String proficiency;
bool name_received = false;
bool proficiency_received = false;
The AsyncWebServer is defined on port 80, which is the HTTP port.
Next, we literally define the HTML file as a raw string literal in the Program Memory (PROGMEM). It contains a form essentially, which asks the user for name and ESP32 Proficiency:
const char index_html[] PROGMEM = R"rawliteral(
<!DOCTYPE HTML><html><head>
  <title>Captive Portal Demo</title>
  <meta name="viewport" content="width=device-width, initial-scale=1">
  </head><body>
  <h3>Captive Portal Demo</h3>
  <br><br>
  <form action="/get">
    <br>
    Name: <input type="text" name="name">
    <br>
    ESP32 Proficiency:
    <select name = "proficiency">
      <option value=Beginner>Beginner</option>
      <option value=Advanced>Advanced</option>
      <option value=Pro>Pro</option>
    </select>
    <input type="submit" value="Submit">
  </form>
</body></html>)rawliteral";
Next, we create a CaptiveRequestHandler class which is inherited from the AsyncWebHandler class. Within the class, we have the constructor, the destructor, and two functions: canHandle() and handleRequest(). The canHandle() function simply returns true here, meaning that our captive portal can handle any request.
Next, the handleRequest function tells the AsyncWebServer what to do when a request is received. This is the function that is responsible for the captive portal opening up every time you connect to the WiFi of ESP32. We simply return the index_html page that we defined above. Please note that send_P is used instead of send because we are fetching a large web page from the Program memory (PROGMEM).
class CaptiveRequestHandler : public AsyncWebHandler {
public:
  CaptiveRequestHandler() {}
  virtual ~CaptiveRequestHandler() {}

  bool canHandle(AsyncWebServerRequest *request){
    //request->addInterestingHeader("ANY");
    return true;
  }

  void handleRequest(AsyncWebServerRequest *request) {
    request->send_P(200, "text/html", index_html);
  }
};
The next function is very important. We set up theAsyncWebServer to respond to various requests, process the data received in the request and send a reply:
void setupServer(){
  server.on("/", HTTP_GET, [](AsyncWebServerRequest *request){
      request->send_P(200, "text/html", index_html);
      Serial.println("Client Connected");
  });

  server.on("/get", HTTP_GET, [] (AsyncWebServerRequest *request) {
      String inputMessage;
      String inputParam;

      if (request->hasParam("name")) {
        inputMessage = request->getParam("name")->value();
        inputParam = "name";
        user_name = inputMessage;
        Serial.println(inputMessage);
        name_received = true;
      }

      if (request->hasParam("proficiency")) {
        inputMessage = request->getParam("proficiency")->value();
        inputParam = "proficiency";
        proficiency = inputMessage;
        Serial.println(inputMessage);
        proficiency_received = true;
      }
      request->send(200, "text/html", "The values entered by you have been successfully sent to the device <br><a href=\"/\">Return to Home Page</a>");
  });
}
What we are telling the server is that if it receives a GET request for the ‘/’ path, then redirect the user to index_html, and it it receives a GET request for the ‘/get’ path (this will be at the time of form submission), then look for the name and proficiency in the response, and extract and store those fields is available, and send an acknowledgment to the user.
Note that “name” and “proficiency” are the names given to the input fields in index_html.
Also note that the above function tells the server how to handle requests irrespective of the Captive Portal. In other words, if you connect to the ESP32’s WiFi field and enter the IP address in the browser, you’ll still be served by the index_html page, and if you fill the form, your request will still be processed.
Next, in the setup() function, we initialize Serial, set the WiFi mode to Access Point (this helps create the WiFi field around ESP32), name the WiFi field as “esp-captive”.
Then we setup the AsyncWebServer using the setupServer command. The next part is important. We setup and start the dnsServer with the following line:
dnsServer.start(53, “*”, WiFi.softAPIP());
What does this mean? For that we first have to understand the meaning of a dnsServer. DNS stands for ‘Domain Name System’. When you type www.google.com in your web browser, the request gets sent to a DNS Server first, which translates this domain name into an IP Address, and then redirects the user to the corresponding IP address. On ESP32 we are creating our own DNS Server, and redirecting any domain name (*) to the IP of ESP32 (WiFi.softAPIP()). 53 stands for the port number. Just like HTTP requests are executed over port 80, HTTPS over port 443, DNS requests are executed over port 53.
So, what happens exactly? How does the system work? Every time your device connects to a new network, it tried to access a specific URL. Which URL? That depends on your device. If it gets a response, it concludes that the internet is connected, else you see a message like “This WiFi has no access to the internet”.
Now, when the device tries to connect with the ESP32’s WiFi, it again tries to send a request to a specific URL. The ESP32’s DNS server redirects it to the Soft AP IP address of ESP32, because remember, we are redirecting all domain names to this IP. On this IP, the captive request handler takes care of displaying the webpage, and the Async Web Server (set up using setupServer()), handles all the incoming request.
Of course, the next line is important, and last piece of the jigsaw puzzle. It links the Async Web Server with the Captive Request Handler, only when the request is in the Access Point mode.
server.addHandler(new CaptiveRequestHandler()).setFilter(ON_AP_FILTER);//only when requested from AP With the system ready, we begin the server.
void setup(){
  //your other setup stuff...
  Serial.begin(115200);
  Serial.println();
  Serial.println("Setting up AP Mode");
  WiFi.mode(WIFI_AP);
  WiFi.softAP("esp-captive");
  Serial.print("AP IP address: ");Serial.println(WiFi.softAPIP());
  Serial.println("Setting up Async WebServer");
  setupServer();
  Serial.println("Starting DNS Server");
  dnsServer.start(53, "*", WiFi.softAPIP());
  server.addHandler(new CaptiveRequestHandler()).setFilter(ON_AP_FILTER);//only when requested from AP
  //more handlers...
  server.begin();
  Serial.println("All Done!");
}
Within the loop, we just keep processing the requests made to the dnsServer and, if name and proficiency are received, we print them.
void loop(){
  dnsServer.processNextRequest();
  if(name_received && proficiency_received){
      Serial.print("Hello ");Serial.println(user_name);
      Serial.print("You have stated your proficiency to be ");Serial.println(proficiency);
      name_received = false;
      proficiency_received = false;
      Serial.println("We'll wait for the next client now");
    }
}
Results:
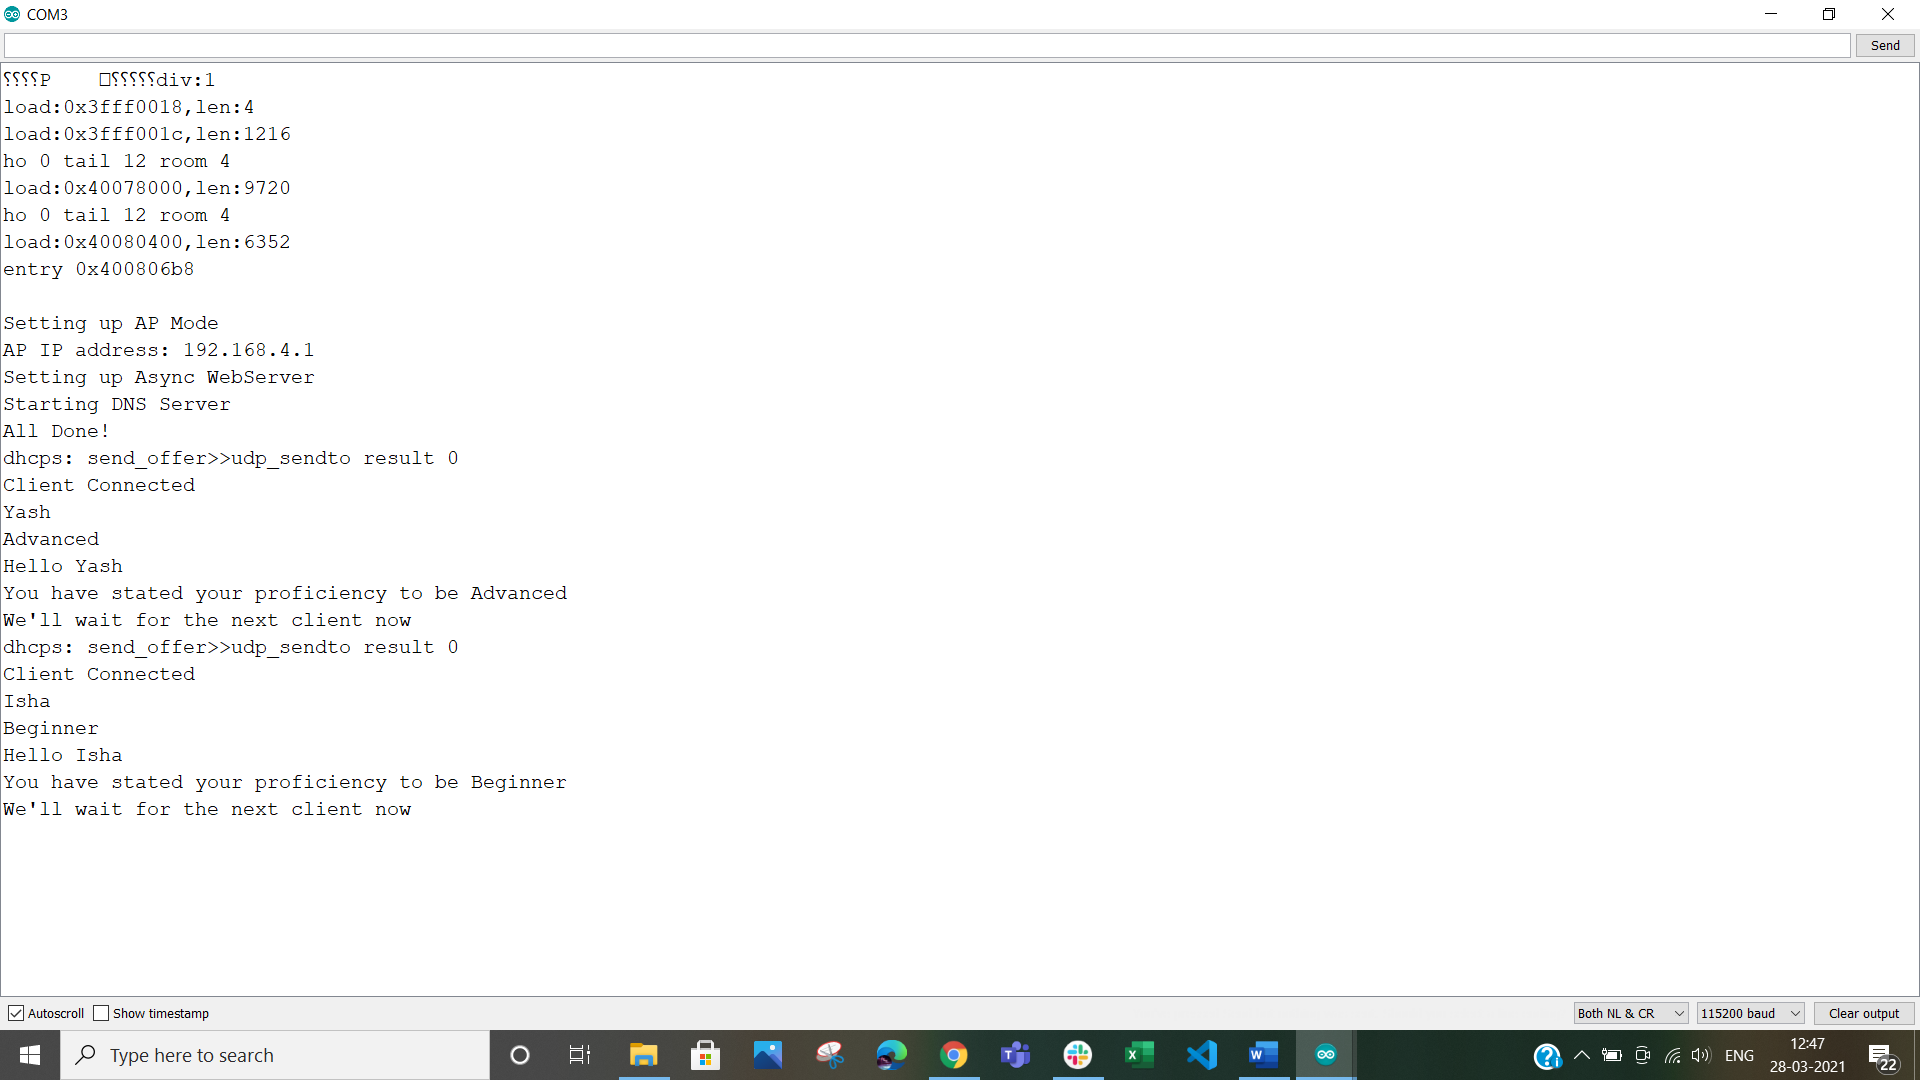
Once you upload this code on the ESP32, the screenshots below will illustrate how the Captive Portal Works, and also the series of prints on the Serial Monitor.

We hope you had fun creating the captive portal using ESP32! As a next step, you can check out the following tutorials:
- Display dynamic webpages with ESP32: How to make the contents of the webpage dynamic and changeable at runtime.
- ESP32 Captive Portal – Fetching HTML from SPIFFS: Bulky HTML files are best stored separately, away from the Arduino code. This tutorial shows how to store an HTML file in the SPIFFS storage of ESP32, and fetch it for display in the Captive Portal.
- ESP32 Captive Portal – Fetching HTML using LittleFS: Same as above, but using the LittleFS file system. This tutorial also covers how to make your Arduino IDE compatible to LittleFS.
- Launch Captive Portal only if WiFi Connect Fails: You will often use the captive portal to get WiFi credentials from the user. Therefore, you need not open the captive portal every time the ESP32 boots up. You can use the saved credentials previously provided by the user. This tutorial explains how that can be done.
For more tutorials on ESP32, checkout https://iotespresso.com/category/esp32/
Since you are here, you may find this course on Udemy, which explains how to link ESP32 with AWS IoT, to be quite interesting. Do check it out.
This is really good and worked first time – many thanks.
I would like to save the HTML file in SPIFFS. Can you provide the change of code required to retrieve and send the file (previously loaded in ESP32 flash mem using LITTLEFS library).
Thank you
Hi Bob,
Thanks for your feedback on the article. It feels great to know that this article helped you. I’ll post the code for SPIFFS interactions shortly.
Hi Bob,
Here’s a tutorial on storing HTML files in SPIFFS and fetching from SPIFFS for display in Captive Portal: https://iotespresso.com/esp32-captive-portal-fetching-html-from-spiffs/. This uses the SPIFFS library instead of LittleFS. An example with LittleFS will also be uploaded soon.
Thank you for your rapid response and the new code. Sadly this didn’t work for me – maybe the upload using LITTLEFS is different to SPIFFS. Look forward to your LITTLEFS coding.
However, for now I’ve put the HTML coding in a separate ‘webpage.h’ file alongside the .ino file and added an #include in the IDE and it remove lots of lines of coding. I can also make the webpage as complex as needed.
I am building a simple wifi sensor to send temperatures to a web server and need to make the unit mobile so want to use your code for entering new wifi ssid/password which will be saved in text file in flash memory.
On startup, the ESP will load ssid/password from the text file and look for STA login. If not found will then run your code. On receiving the ‘submit’ it will re-write the text file then do a restart.
Your coding has removed the need to know the IP address which has been a pain. I guess this redirect information has been out there for ages but your straightforward explanation and easily understood code has made it so easy. Thank you once again.
Regards,
Bob
Hi Bob,
Thanks for your kind words. I’m really happy that you found this tutorial helpful. Your method of putting the HTML in a separate .h file is also good. It helps keep the code clean and uncluttered.
The LittleFS tutorial is also ready. You were right, the upload part is different, and I’ve covered the steps in the tutorial. You can find it here: https://iotespresso.com/esp32-captive-portal-fetching-html-using-littlefs/
Magic – because I already use LITTLEFS I only had to change 1 line. Works a treat – many thanks once again.
Your instructions are straightforward and informative – Brilliant.
Do you know how I can populate the two input boxes with ‘myssid’ and ‘mypassword’ variables loaded from flash mem?
Tried your dynamic %options% coding but think it is for the dropdown boxes. The relevant bit from my html file as follows:
SSID name
Password:
Thanks again
Bob
Hi Bob,
You can try setting the default values for these fields using the ‘value’ attribute, and add a placeholder for the actual value of this attribute. See https://www.w3schools.com/tags/att_input_value.asp
So something like
input type=”text” id=”ssid” name=”ssid” value=%PLACEHOLDER_VALUE%
Thanks for your comments. Have tried your dynamic version again. Are you aware this works with ‘chrome’ but not with ‘Safari’?
Hi Bob,
No, I was not aware of this. Thanks for pointing this out. Let me look into this.
Thanks! Great tutorial, I got it to work after resolving some issues with Apple Mac computer and path for python3 “serial”. If anyone has the same issue answered here by Kohn1001 here is the link: https://stackoverflow.com/questions/6819661/python-location-on-mac-osx .
I am interested in something similar to what @Bob stated previously. When ESP32 starts looks for previously set values for ssid ,pass, static ip, subnet gateway etc. If not or cannot connect for 60 seconds start softap / captive portal. User selects from available ssid (if Possible) enters ssid password, Static IP (if required), gateway, etc, then connects to ssid as configured. etc have been set. Do you have code availablefor this andif so would you kindly share?
Hi Nate,
This can be achieved using ‘Preferences’ in ESP32. I’ll prepare a simple tutorial, with the relevant code, for this exact use case, and post in 1-2 days.
Hi Nate,
This tutorial here will help: https://iotespresso.com/esp32-launch-captive-portal-only-if-wifi-connect-fails/
EspHome has a great solution but requires home assistant. I would like this functionality on the esp without using Home assistant.
https://esphome.io/components/captive_portal.html
Hi..
I download the captive portal .ino example but the function
setupServer();
It is not recognized..
Hi,
Can you provide more context? Which IDE you used, what is the exact error statement, what board you are compiling for, etc.?
Hi, thanks for this amazing Tutorial!
Is possible with this Captive ( the best, work all times ) to show in html page one Float Variable ( from my sensor ) every 5 second?
Thank you
Hi,
You can follow the tutorial for showing dynamic webpage on the captive portal. You will have to rebuild the page periodically.
https://iotespresso.com/display-dynamic-webpages-with-esp32/
How do I make it actually connect to internet when I entered data?
Like I got a WiFi network and I want this to connect to the actual WiFi network for the client that entered the data.
You can switch to the station mode once you get data from the captive portal form.