In this tutorial, we will look at two ways of setting/ changing the partition scheme in ESP32: the easy way and the advanced way. If you are an absolute beginner with ESP32, chances are that you will not have to change the partition scheme for any of your initial projects. It is not recommended to change the partition scheme unless you have strong reasons to do so. A very bulky application that doesn’t fit in the default space reserved for the application code is one such reason.
The Easy Way
This is UI-based (using the Arduino IDE). If you go to Tools -> Partition Scheme, you will be able to see the list of partition options available at your disposal.
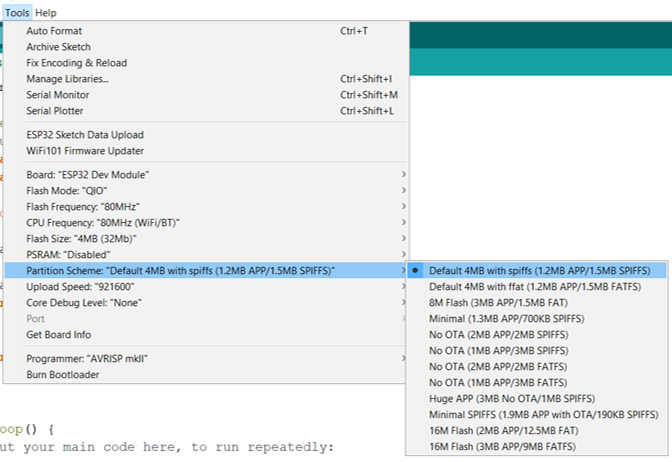
As you can see, the default partition scheme is for a 4 MB Flash, of which 1.2 MB is reserved for your application code, 1.2 MB is reserved for OTA (Over The Air update), and 1.5 MB is reserved for SPIFFS.
We will discuss about SPIFFS in a separate tutorial, but, for now, you can understand that SPIFFS is like a mini-SD Card onboard the ESP32 chip. You can use it to create and store small files.
From all the available options, you can, depending on your requirements, choose an option that suits you. For example, if you are not going to perform OTA on the device (i.e., you aren’t going to update the code of your ESP32 remotely, after it is deployed), you can choose one of the No OTA options, or even the Huge App option. If you are not going to use the SPIFFS storage, you can use the Minimal SPIFFS option, giving more space to the app and OTA.
At this point, you may be wondering, what if I want neither OTA nor SPIFFS? Surely, such an option is not visible in the list.
If you definitely need such an option, or any option not available in the default list, head on to the next section.
The Advanced Way
In this approach, we will be making custom changes to the partitions. Be careful with the changes you make here. These are not to be made unless absolutely necessary.
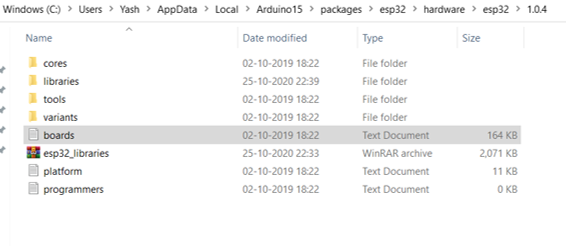
For this approach, first locate the partitions CSV of your ESP32. On Windows, the path is usually:
C:\Users\<YourUserName>\AppData\Local\Arduino15\packages\esp32\hardware\esp32\1.0.4\tools\partitions
You basically have to locate the Arduino folder, and then the esp32 package folder. Within that, the path should be \hardware\esp32\1.0.4\tool\partitions.
You will see a number of CSVs in this folder.
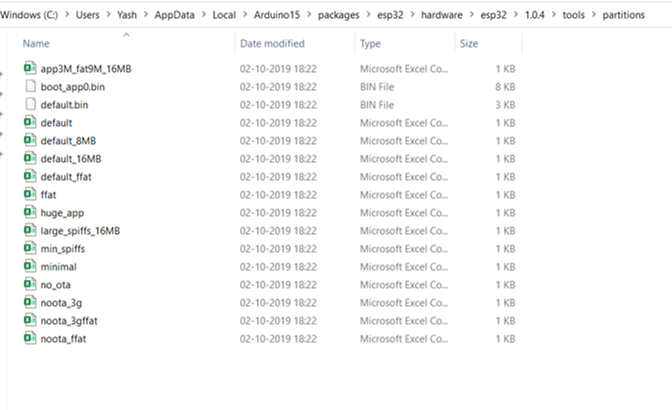
As you would have guessed, these correspond to the various options shown in Tools -> Partition Scheme in the Arduino IDE.
Open one of the CSVs, say the one corresponding to the default partition.
It should look like this:
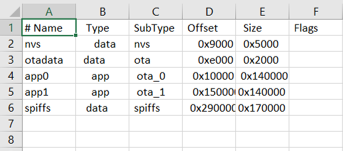
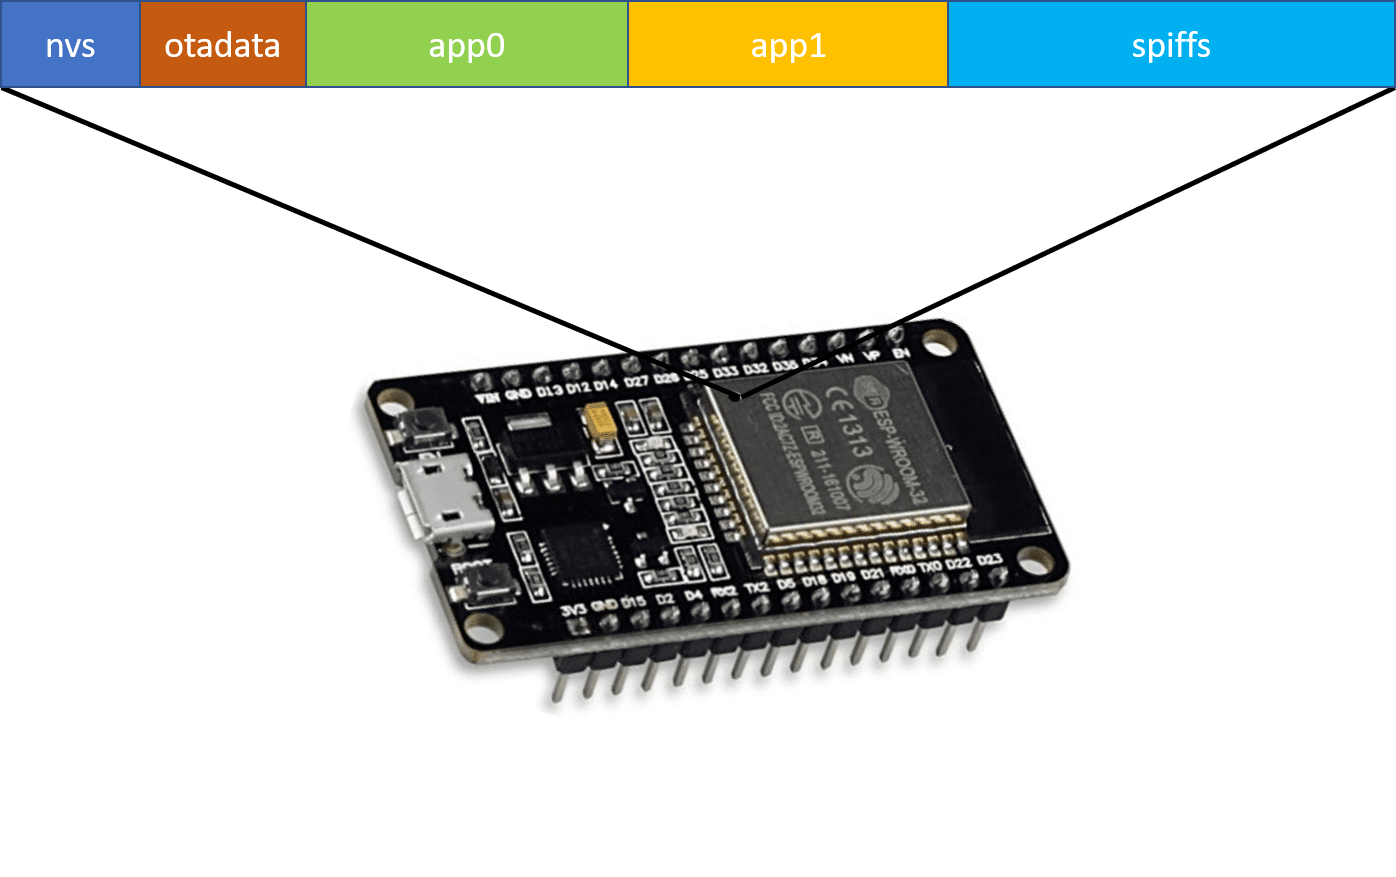
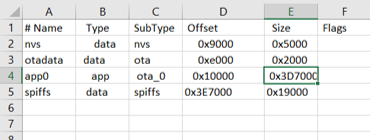
As you can see, this contains the memory offset and the size for various sections.
- nvs corresponds to non-volatile storage.
- otadata holds data for OTA updates
- app0 holds the application code
- app1 is reserved for storing the downloaded OTA files
- spiffs corresponds to the SPIFFS storage
As you can see, by default, the size reserved for app is 0x140000 bytes, or 1310720 bytes, which corresponds to 1.25 MB. Same space is reserved for OTA. For SPIFFS, the memory reserved is 0x170000 bytes or 1507328 bytes, which corresponds to 1.4375 MB.
Now, suppose we don’t want to perform OTA, and also reduce the space reserved for SPIFFS to just 100 kB. Thus, SPIFFS size will be 102400 bytes or 0x19000 bytes. Thus, app0 size will be (1310720+1310720+1507328-102400) = 4026368 bytes or 0x3D7000 bytes.
With these changes, the default partitions CSV to something like this:
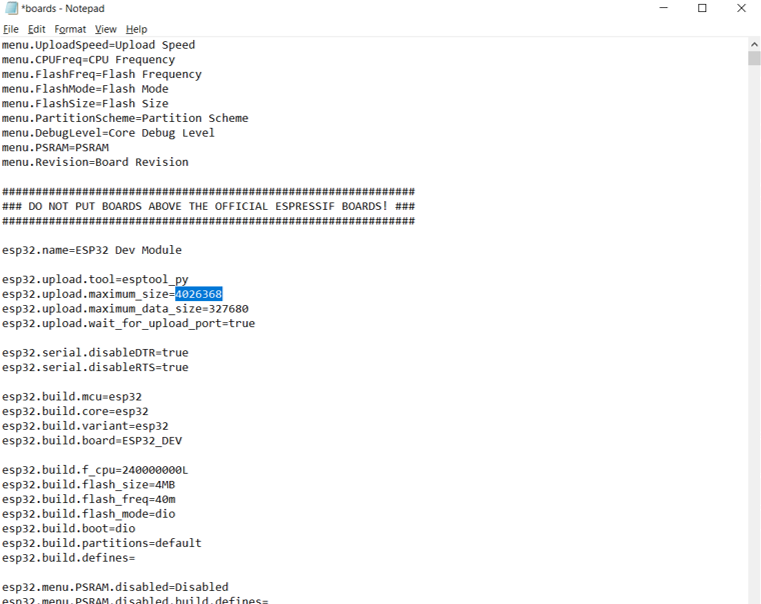
There’s another change that has to be made in boards.txt. Go back a couple of folders. On Windows, the path you need to go to is:
C:\Users\<YourUserName>\AppData\Local\Arduino15\packages\esp32\hardware\esp32\1.0.4
You will see a boards.txt file.
Open that file, and change the esp32.upload.maximum_size for the board of your interest. I’m going to use the ESP32 Dev Module. Therefore, I will change the maximum upload size for the Dev Module.
Now let’s see the impact in the Arduino IDE. Since we have changed the default partition scheme, we will not change the partition scheme from Tools -> Partition Scheme. We will let it stay default.
Now, before changing the partition scheme, we had compiled one code, which, on compilation, showed the following message:

Observe the statement, ‘Maximum is 1310720 bytes’. Now, we closed and re-opened Arduino IDE and compiled the same sketch again. The message displayed now is:

As you can see, the maximum sketch size has now changed. The message now reads ‘Maximum is 4026368 bytes’ and you can try uploading a heavier sketch, larger than 1310720 bytes, and it will work.
I hope you enjoyed this tutorial and found it useful. Checkout other ESP32 tutorials here: https://iotespresso.com/category/esp32/
Also, follow IoT Espresso on Twitter for getting notified about the latest posts.
Thanks for your article.
I have a doubt, maybe you could help me, it is about the OTA data partition, it has a size of 0x2000, being two sectors 4kb, the bootloader will see such OTA data partition to choose the application partition to boot but how those bytes of OTA data partition are filled????.
I thank you in advance for your help.
First of all, apologies for the late reply. Was unavailable for the past few days. The population of the ota_data_partition will typically be handled by the library you use for performing the OTA. For example, in relevant Arduino examples, you will find the Update.h library being used for handling OTA updates. Within the Update.end() function, a _verifyEnd() function is invoked. This function, in turn, invokes the esp_ota_set_boot_partition() function, which updates otadata partition, as mentioned here: https://docs.espressif.com/projects/esp-idf/en/latest/esp32/api-reference/system/ota.html#:~:text=Pass%20the%20received%20partition%20to%20esp_ota_set_boot_partition()%2C%20this%20will%20update%20the%20otadata.
Hello,
I’m using NodeMCU board
This option is not available to me.
Also, I can’t find the folder mentioned in the advanced way.
Does this mean that I can’t change the partition of this board?
If yes, which board do you advise me to get?
Hi,
In the Arduino IDE, you can select ESP32 Dev Module instead of NodeMCU, and that should work just fine.