Introduction
In your IoT journey, sooner than later, you may be required to develop an app for interfacing with your IoT devices. Now, if you are an individual hobbyist, an early-stage startup, or even a well-established startup for that matter, you may be faced with a question: whether to invest in two teams for app development (one for Android and one for iOS), or a single team using a cross-platform development tool (like Flutter or React Native).
A few years ago, the answer would have been simple: you needed two teams because the cross-platform development tools were not mature enough. Today, again, the answer is simple. However, it is different! Today, Flutter has evolved so much and has such a thriving community that it is difficult to justify investing in two separate teams. So what’s the buzz all about? What is Flutter, and why and how should you get started with it? Read on to find out!
Scope of this article
This article will focus on making you familiar with Flutter and related tools. By the end of this article, you shall be able to understand what Flutter is, why should you choose it for your development, and most importantly, how to get started.
This article will essentially just be scratching the surface, and you are expected to learn more by yourself, preferably by developing multiple apps in Flutter.
What is Flutter?
Flutter is a framework developed by Google that allows you to create apps for multiple platforms: Android, iOS, web, and so on, using a single codebase. Yep, that’s right. You write a single piece of code for your app, and it runs on all platforms. The code is written in a language called dart. If you have worked with React/React Native in the past, dart will be easy to grasp.
Making your first app
Without much ado, let’s quickly get our hands dirty, and create our first app. Here’s the steps you need to follow:
- Depending on your OS, follow the instructions here to get flutter installed.
- Depending on the editor of your choice (VS Code, Android Studio, or Emacs) install the flutter and dart plugins by following the instructions here. The next steps assume Android Studio as the editor, although the steps are similar for other editors as well
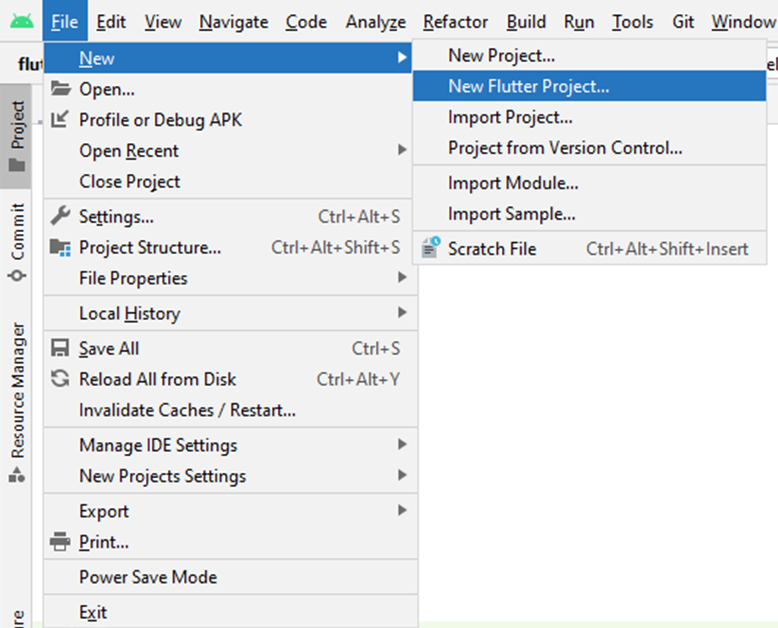
- On Android Studio, click on File -> New -> New Flutter Project. In the dialog that opens up, provide the path to your flutter SDK (basically the path to the flutter folder downloaded in step 1 above)
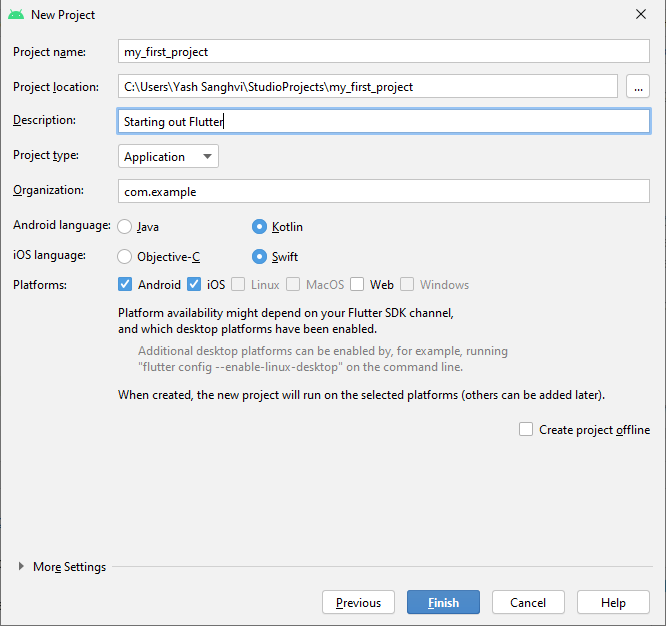
- Enter a name and select a location for your application. Leave the project type as ‘Application’. Select the Android and iOS languages, and the supported platforms, and then click on ‘Finish’.
A new project is created for you. If you look at the project structure, you will see a structure similar to the image below:
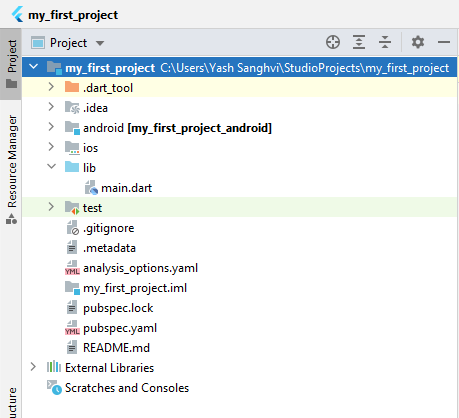
There are separate directories for android and ios, for platform specific code. Thus, if you wish to make any changes specifically for Android, say in the AndroidManifest.xml file, you’ll find it in the android folder. Same goes for ios.
The lib folder contains all your application dart files. In this case, we just have main.dart, which is typically the default starting point of any application. You can of course have multiple files and directories within the lib folder as your application gets larger.
The pubspec.yaml file is like the file containing the build resources. You can think of it as the package.json file in a Node.js project, although here, apart from all the imported packages, you also keep a track of all the assets used in your application (like images, gifs), and the version number of your app. To know more about this file, read here.
Now, let’s have a look at the code. Luckily for us, it is very heavily commented and there is no need of reinventing the wheel by going over the code blocks again, and reiterating what the comments have already explained. For the sake of completeness, including the code below, so that this post makes sense even if the default Flutter app changes in the future.
import 'package:flutter/material.dart';

void main() {
  runApp(const MyApp());
}

class MyApp extends StatelessWidget {
  const MyApp({super.key});

  // This widget is the root of your application.
  @override
  Widget build(BuildContext context) {
    return MaterialApp(
      title: 'Flutter Demo',
      theme: ThemeData(
        // This is the theme of your application.
        //
        // Try running your application with "flutter run". You'll see the
        // application has a blue toolbar. Then, without quitting the app, try
        // changing the primarySwatch below to Colors.green and then invoke
        // "hot reload" (press "r" in the console where you ran "flutter run",
        // or simply save your changes to "hot reload" in a Flutter IDE).
        // Notice that the counter didn't reset back to zero; the application
        // is not restarted.
        primarySwatch: Colors.blue,
      ),
      home: const MyHomePage(title: 'Flutter Demo Home Page'),
    );
  }
}

class MyHomePage extends StatefulWidget {
  const MyHomePage({super.key, required this.title});

  // This widget is the home page of your application. It is stateful, meaning
  // that it has a State object (defined below) that contains fields that affect
  // how it looks.

  // This class is the configuration for the state. It holds the values (in this
  // case the title) provided by the parent (in this case the App widget) and
  // used by the build method of the State. Fields in a Widget subclass are
  // always marked "final".

  final String title;

  @override
  State<MyHomePage> createState() => _MyHomePageState();
}

class _MyHomePageState extends State<MyHomePage> {
  int _counter = 0;

  void _incrementCounter() {
    setState(() {
      // This call to setState tells the Flutter framework that something has
      // changed in this State, which causes it to rerun the build method below
      // so that the display can reflect the updated values. If we changed
      // _counter without calling setState(), then the build method would not be
      // called again, and so nothing would appear to happen.
      _counter++;
    });
  }

  @override
  Widget build(BuildContext context) {
    // This method is rerun every time setState is called, for instance as done
    // by the _incrementCounter method above.
    //
    // The Flutter framework has been optimized to make rerunning build methods
    // fast, so that you can just rebuild anything that needs updating rather
    // than having to individually change instances of widgets.
    return Scaffold(
      appBar: AppBar(
        // Here we take the value from the MyHomePage object that was created by
        // the App.build method, and use it to set our appbar title.
        title: Text(widget.title),
      ),
      body: Center(
        // Center is a layout widget. It takes a single child and positions it
        // in the middle of the parent.
        child: Column(
          // Column is also a layout widget. It takes a list of children and
          // arranges them vertically. By default, it sizes itself to fit its
          // children horizontally, and tries to be as tall as its parent.
          //
          // Invoke "debug painting" (press "p" in the console, choose the
          // "Toggle Debug Paint" action from the Flutter Inspector in Android
          // Studio, or the "Toggle Debug Paint" command in Visual Studio Code)
          // to see the wireframe for each widget.
          //
          // Column has various properties to control how it sizes itself and
          // how it positions its children. Here we use mainAxisAlignment to
          // center the children vertically; the main axis here is the vertical
          // axis because Columns are vertical (the cross axis would be
          // horizontal).
          mainAxisAlignment: MainAxisAlignment.center,
          children: <Widget>[
            const Text(
              'You have pushed the button this many times:',
            ),
            Text(
              '$_counter',
              style: Theme.of(context).textTheme.headline4,
            ),
          ],
        ),
      ),
      floatingActionButton: FloatingActionButton(
        onPressed: _incrementCounter,
        tooltip: 'Increment',
        child: const Icon(Icons.add),
      ), // This trailing comma makes auto-formatting nicer for build methods.
    );
  }
}
If you run this code, by either connecting a physical device, or on an emulator, you will see an app like the one below:
Congratulations! You just created your first app using Flutter. Now that we’ve got our hands dirty, time for some theory.
Widgets in Flutter
Don’t confuse these with the OS widgets that you see in your mobile phones for apps like Music Player and Timer. The Flutter Widgets are the building blocks of any app developed in Flutter, and they determine what the UI should look like at any point, given the current state and config. If you see a text centered on the screen, then the Text itself is a Widget, lying within another widget (either a Container, or Center).
There are two types of Widgets:
- Stateless Widgets – These don’t change appearance based on user input
- Stateful Widgets – These change appearance based on user input
Take the example of a Text Widget. It will always just display the text and in the style provided as input. Such a widget need not maintain any state of its own, and hence it is a type of a Stateless Widget.
On the other hand, if you consider a Checkbox Widget, you need a way to store the current state (whether it is checked or not). As soon as the state changes, you rebuild the Widget and the UI changes according to the state.
In the example app of the previous section, there are multiple Stateful and Stateless widgets. Two are explicitly mentioned. MyApp is a Stateless widget, while MyHomePage is a Stateful widget. Apart from these, Scaffold is a Stateful widget, while Text and FloatingActionButton are Stateless widgets.
A Stateful Widget always has a State object that contains fields that determine how that widget looks. In the above example, MyHomePage widget has the _MyHomePageState() object with the counter field determining how it will look. This object always has a build method that determines the layout of the Widget on the screen. Every time you wish to trigger a rebuild of a Stateful widget, you call the setState() method. This calls the build function with the updated state.
In the above example, the setState() method is called every time the floating action button is pressed and the counter increments. This triggers a rebuild of the MyHomePage widget, that causes the updated counter value to show on the screen.
If you wish to explicitly initialize some state variables before the first build of the Stateful widget is triggered, you can do so within the initState() method. In fact, what will help you here is an understanding of the entire lifecycle of a Stateful Widget. This post explains that very well.
You can have Stateless Widgets within Stateful Widgets, and vice versa. How do setState() operations affect the UI rendering in either of these cases? That is explained in this very good StackOverflow answer.
Hot Reload in Flutter
One interesting thing about flutter is the ‘Hot Reload’ option, which significantly reduces the development time. Suppose you have added a button to your app, and don’t like it’s background color. You make some changes in the code to try out another color. In native development, you need to hit the ‘Build’ button again. The app gets restarted, and you need to navigate to the screen on which you wish to see the change.
In Flutter, you just need to click Ctrl + S (or Cmd + S on a mac), and voila! the change is visible on your device with no need for the app to be restarted. Note that this works best only for UI changes. If you are making any logical change (say how an API response is handled in the background), then it is best to ‘Hot Restart’ (not Reload) the app and try.
Hot Reload simply rebuilds the current widget tree, without destroying the state. It doesn’t call main() or initState() again.
Hot Restart loads the code changes in the Virtual Machine on your device, and restarts the app.
Full Restart, on the other hand, recompiles the native code (Java/Kotlin/Swift/Objective C), and also restarts the Dart development compiler.
As you would have guessed, Hot Reload is the fastest option, whereas Full Restart is the slowest.
Packages and Pub.dev
Just like you have libraries in your C/C++ projects that you import at the start of the project, you have packages in flutter. And there is a store for all the flutter packages: pub.dev. All packages on pub.dev typically have a descriptive readme that explains how to add the package to your project and how to use it.
In general, to include a package in your project, simply add it to pubspec.yaml, and then include it at the top of the relevant file using that package. For instance, if I want to add the logger package for printing log statements, I’ll include the following in pubspec.yaml dependencies:
dependencies:
  flutter:
    sdk: flutter
  logger: ^1.1.0
Next, in the file wherein I’m defining the logger class, I’ll import the package:
import 'package:logger/logger.dart';

final logger = Logger(
  printer: PrettyPrinter(
    methodCount: 0,
    errorMethodCount: 5,
    lineLength: 120,
    colors: true,
    printEmojis: true,
    printTime: false,
  ),
  level: Level.info,
);
Integrating Native Code
While you may want to create an app purely in dart, you may not always be allowed to do that. Suppose you want to integrate a third-party SDK into your app, and suppose the SDK is available in only Kotlin and Swift. What do you do? Luckily, there’s a provision in flutter to integrate native code into your app. The keywords you are looking for are ‘platform channels’ or ‘method channels’. While I won’t elaborate more on this topic, as it is not well suited for a beginner’s post, you can read more here if you are interested. The takeaway is that integrating native code in your flutter apps is very much possible.
Next steps and Resources
First of all, thank you for reading this article. I hope that this article has given you some confidence to explore flutter by yourself. The next step for you should be to build as many apps as possible. App development is one of those areas where you learn the most by being hands on. However, if you do wish to get more guided experience, please refer to Flutter’s official documentation. If you are looking for a dedicated course, I can recommend this one on Udemy.
I hope you enjoyed this article. If you think that the article has some content missing that should have been included, please let me know in the comments. For more beginner’s guides, click here.