If you are into IoT, chances are that you’ve heard of ESP32, or at least ESP8266. Some articles might have even credited these chips with the acceleration of the IoT industry. If you are a beginner in IoT, you may be wondering what the hype is all about. Well, then this article is for you. In this article, we will cover all the broad areas of ESP32 that will help you get started.
Introduction
ESP32 is a System on Chip (SoC) developed by Espressif. It is an upgraded version of its predecessor (ESP8266) and boasts of the following major features:
- WiFi support (IEEE 82.11 b/g/n)
- Bluetooth (4.2) and Bluetooth Low Energy (BLE) support
- Real-Time Clock (RTC)
- Cryptographic Accelerators: AES, SHA-2, RSA, ECC, Random Number Generator
- Flash Encryption
- 4 MB flash
- 520 KB SRAM
- X-tensa dual core processor
- 160 or 240 MHz clock speed
- 34 Programmable GPIOs
- 4x SPI, 3x UART, 2x I2C, 12x ADC, 2x DAC
Now read the above features again, but this time, from the perspective of developing an IoT device. Think of what you’ll need for developing an IoT device and see if ESP32 can meet the requirement:
- Sensor Interface: There’s SPI/UART/I2C/I2S/CAN/ADC support
- Processing: There’s 520 KB SRAM, 160 MHz clock, dual-core Xtensa processor
- Connectivity: You have Wi-Fi, Bluetooth, BLE
- Security: You have cryptographic accelerators (that enable HTTPS, AES-128, and others), flash encryption, secure boot
- Storage area: There’s 4 MB of flash that can be partitioned into Non-Volatile Storage (NVS), application area, Over-The-Air (OTA) update area, factory reset area, SPIFFS (a mini-SD card on the chip itself)
- LED and other Interfaces: You have 34 GPIOs
- Timekeeping: You have internal RTC (although you might need an external RTC with a coin cell if you wish to maintain time between power cycles)
Now you might be starting to get an idea of what the hype is all about. Let’s continue further. When you have a very good chip that meets all your requirements, what’s the next best thing for you as a firmware developer? Ease of programming the chip! ESP32 can be programmed using Arduino IDE! Espressif has a dedicated framework (ESP-IDF) for developing the firmware and flashing it on the ESP32 chip. It has much higher configurability and is the preferred option for application firmware development. However, it has a slightly steeper learning curve than Arduino IDE. With Arduino IDE, you can get started with ESP32 in minutes.
To add to the above, there’s a thriving developer community (especially for the Arduino platform), and you’ll find answers to nearly all your queries on the internet. The ESP32 documentation for IDF is also quite comprehensive and detailed, further aiding your development.
So far, we discussed the benefits from the perspective of a developer. What about a project/product manager? What will be the metric they are interested in? You got it right: cost and lead times. Now, ESP32 modules cost ~$2 at scale, and SoCs cost even less. This is among the (or perhaps THE) lowest in the industry, for the features they provide. The lead time for the ESP32 modules at scale is generally at par with the industry standard and therefore, that, too, isn’t a cause of worry.
Module vs. SoC vs. Development Board
So far, we have mentioned ‘module’ very frequently. However, ESP32 can be obtained as a module, an SoC (System on Chip), and a development board.
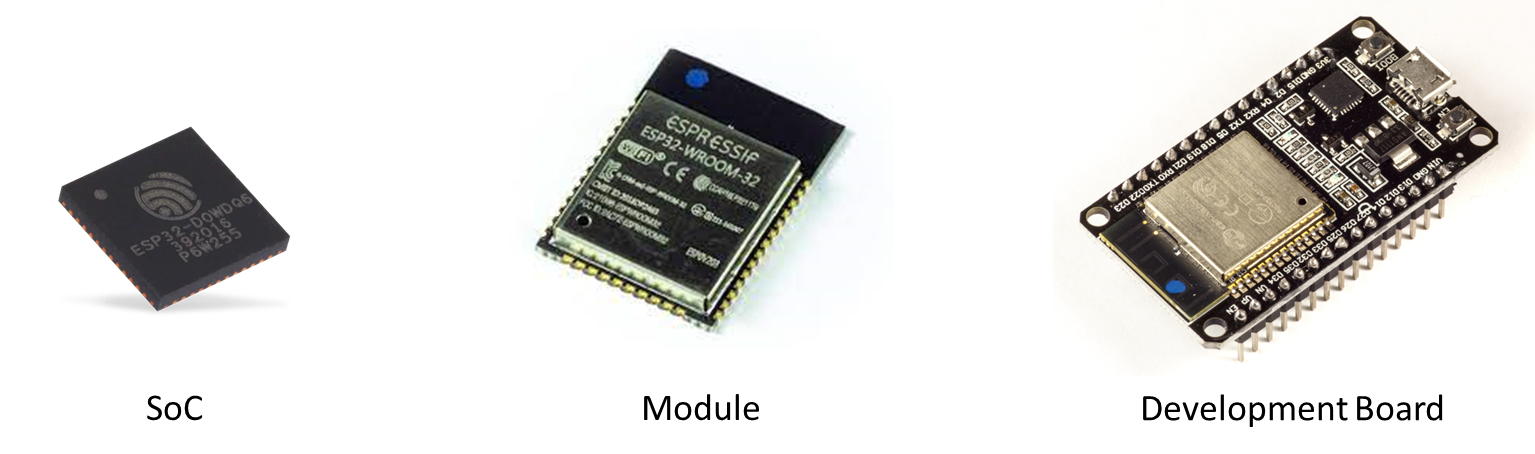
The module contains the SoC and other components like the crystal, the antenna, and the RF-tuning circuit. It is ideal for teams that don’t have in-depth hardware experience in designing their own antenna and tuning circuit. With the SoC, the antenna and the tuning circuit have to be designed in-house and all the relevant RF tests need to be cleared. The advantage, off-course, is in terms of the cost.
The development board is primarily for learning and breadboard prototyping. It has several additional components over a module, like the micro-USB port, USB to UART converter, voltage regulator, built-in LED (in some cases), and so on.
Different offerings of ESP32
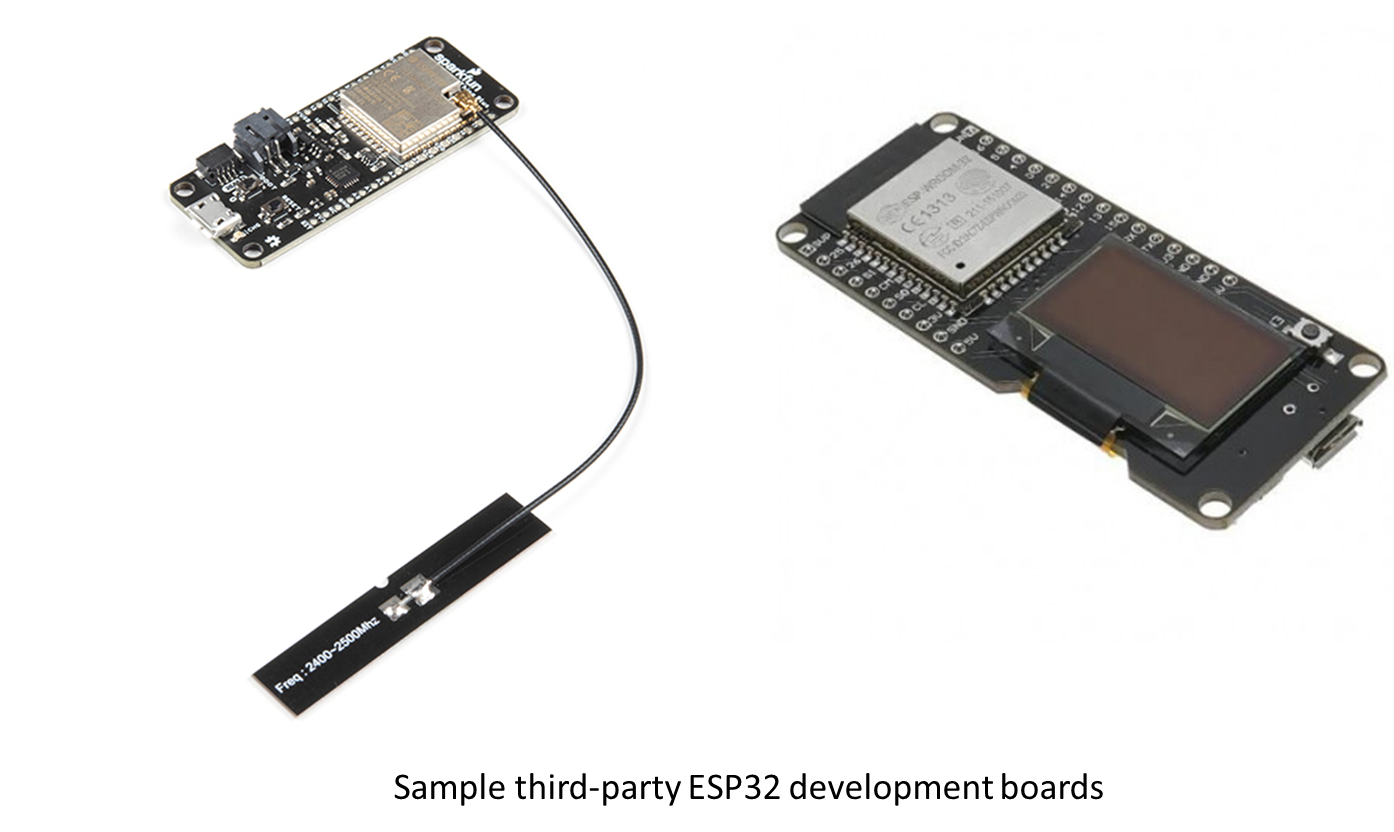
If you wish to purchase an ESP32 module, SoC, or a development board, you’ll be overwhelmed with choices. You’ll find many official variants, and several third-party boards as well. Let me try and simplify the choices for you.
Espressif has three series of modules/SoCs: ESP32, ESP32-S, and ESP32-C. S and C series have further subdivisions (S2, S3/ C2, C3). Each series/sub-series has several module offerings covering different footprints and slightly different specifications. Feature wise, a good comparison can be found here.
However, for a very crude understanding, think of the ESP32 series as the base series (the specs given above correspond to this series), C-series as the cost-optimized series with lower specifications and lower cost, and the S series as the advanced series for high-end applications (neural network computing, signal processing, ultra-low power applications, and so on).
If you have a specific set of requirements, you can check out the ESP32 SoC and Module Selector offered by Espressif. If you don’t know where to start, the ESP32 series is a good starting point. You can then move to either the C series or the S series depending on your application.
Now, coming to the development boards, you can find the officially offered DevKits (as Espressif calls them) here. Apart from these, you can also find various other development boards related to ESP32 in the market, offered by other vendors (like Sparkfun). There are boards that have integrated OLED screens, SD Card slots, LoRaWAN support, battery slots, GSM slots, and so on.
You can use these boards for learning and prototyping purposes. These can be very handy for a college project, or for developing a quick Proof of Concept (PoC). However, many of them can have custom modules developed around the ESP32 SoC by the corresponding vendor. If you plan to use modules in your mass production instead of SoCs, it is recommended to perform all your tests and validation on the official Espressif modules, before giving the final go-ahead.
How to get started as a beginner?
A hands-on project is the best way to start. However, if you do not have a well-defined project yet and want to get your hands dirty with ESP32, here are some steps you can follow to get started:
- Order an ESP32 Dev board and a micro-USB cable
- Download Arduino IDE and install the ESP32 Add-On (see the steps here)
- In the Arduino IDE, go to File-> Examples and check out the ESP32 specific examples
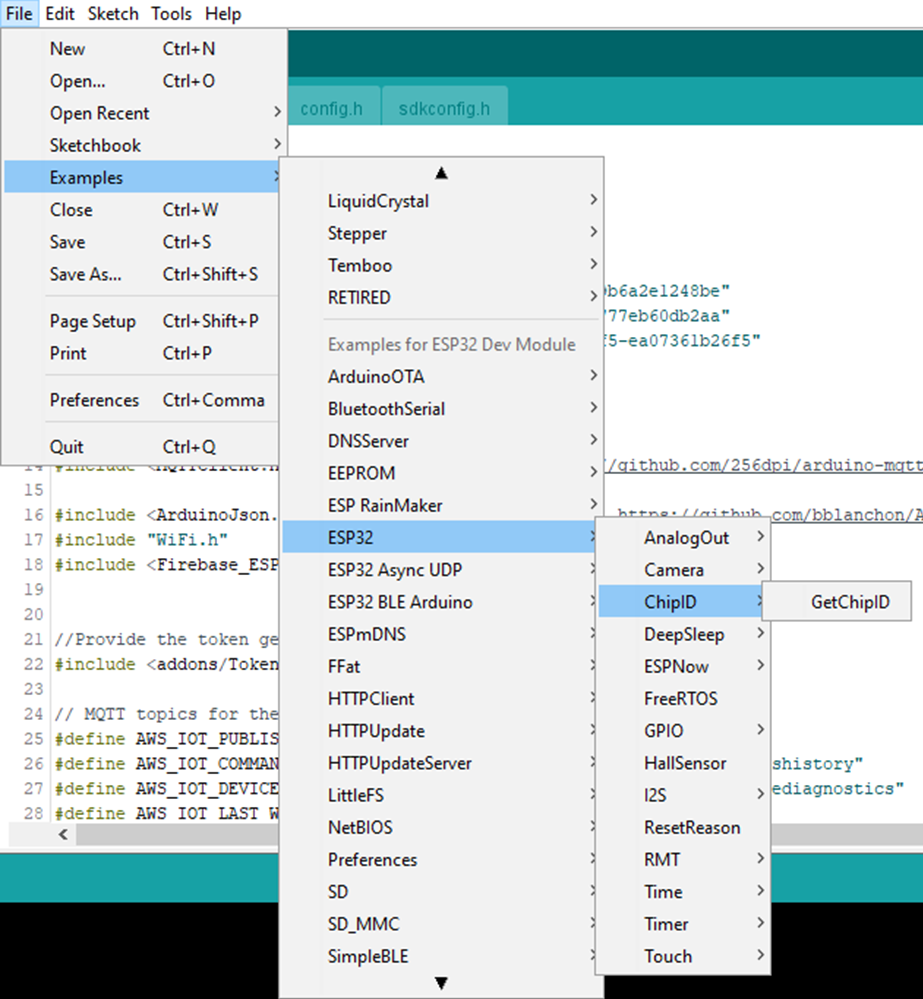
- Start with basic examples (LED blinking, timer, reading chip ID, ADC, PWM, etc.) that are unrelated to connectivity, and then move on to connectivity-related examples (WiFi and BLE)
- Move on to advanced topics like SPIFFS, DNSServer, HTTPS, and OTA.
Once you are comfortable with Arduino IDE, move on to ESP-IDF and similarly get started with the examples that come in with IDF.
For more tutorials on ESP32, check out https://iotespresso.com/category/esp32/. Also, you may find this course on ESP32 on Udemy to be quite helpful. Do check it out
I like what u say l fine it very interesting thank u