You may want to verify that the access token in the Authorization Header of any incoming REST API request belongs to the Cognito User Pool that you configured. This article lists the steps to do it.
Prerequisites
- It is assumed that you have a Cognito User Pool created. If not, you can follow the steps here to create one.
- It is also assumed that you have an API Gateway REST API created. It can be linked to a lambda service, or to any other service.
Using AWS Console
Step 1: Create a Resource Server in Cognito
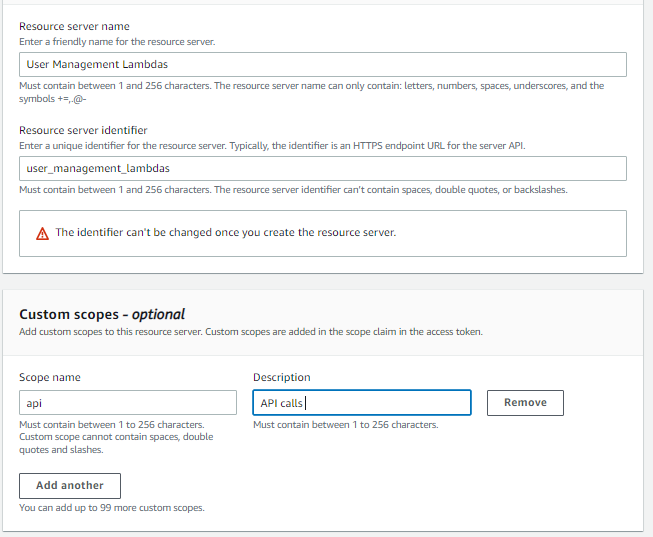
Go to your Cognito User Pool, and click on the App Integration section. Scroll down to ‘Resource Servers’, and click on ‘Create Resource Server’. A Resource Server is essentially an identifier for your resources. Its use will become more clear as you read through this article. For now, enter a name and a unique identifier for the resource server (like your app name, or an HTTP URL for your APIs, or even your pet’s name). I’ll set my identifier as user_management_lambdas as this resource server will essentially provide access to a bunch of user management lambdas behind the API gateway.
Add a custom scope for this resource server, say ‘api’. You can add any other scope that makes sense to you (like ‘read’, ‘write’, ‘modify’, ‘abracadabra’, etc.)
Step 2: Add the custom scope in the Resource Server as a claim to the specific app client
Now, go to the specific app client that should access the APIs that you want to protect via the Cognito Authorizer. Scroll down to the ‘Hosted UI’ section, and click on ‘Edit’. Scroll down to ‘Custom scopes’ and select the scope you just created from the drop down. In my case, it will be user_management_lambdas/api. Click on ‘Save changes’.
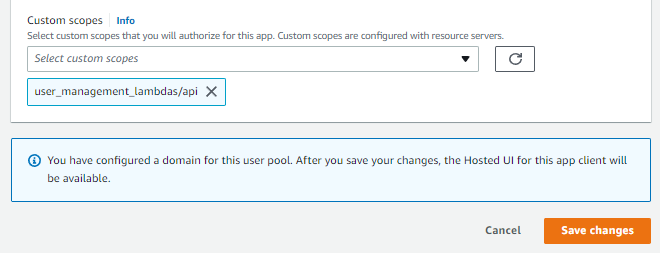
Note that if there are active users for this particular app client when you make this change live, they will get a ‘Session Expired’ message as soon as their current access token expires. They will have to sign in again. Their new access token will contain the added custom scope as an additional claim. You can pass an access token through jwt.io and you will be able to see the additional scope.
Step 3: Create a Cognito Authorizer in API Gateway
Now, go to API Gateway and select the API that you’d like to secure. From the left pane, select ‘Authorizers’ and click on ‘Create New Authorizer’. Give it a name, say ‘Cognito Authorizer’, and select ‘Cognito’ as the type. Select the user pool from the available options, and for the token source, enter ‘Authorization’. This tells the authorizer to look for the token in the ‘Authorization’ header. You can optionally add a regex pattern for validating an incoming token. After that, click on ‘Create’.
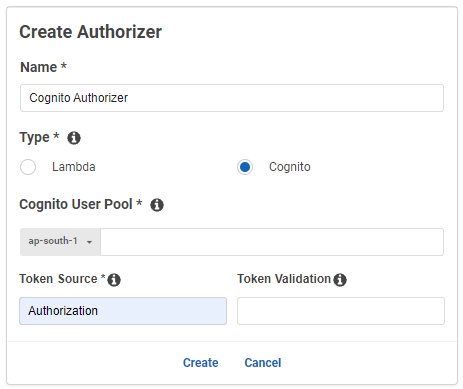
Note that if you test the Authorizer using an access token, it will not work, as the Authorizer assumes an ID token by default. Only the addition of custom scopes in the verification makes the Authorizer expect an access token.
Step 4: Modify the Method Resource of the Method you want to secure
Now, finally, go to the ‘Resources’ section from the left pane. For every method where you want to add the Custom Authorizer, click on the ‘Method Request’ section.
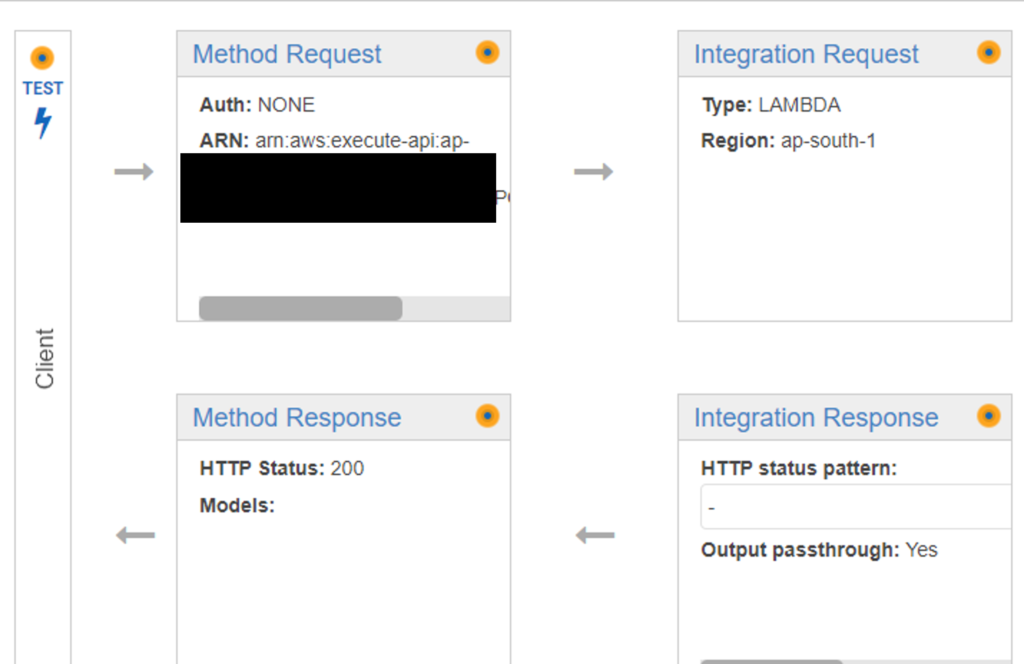
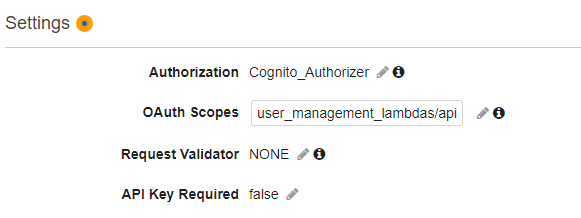
Click on the ‘Edit’ icon next to ‘Authorizer’ and select the Authorizer you created in the previous step and click on the tick mark icon. For Oauth Scopes, enter the custom scope you had created earlier. In the example shown in this article, it’s user_management_lambdas/api.
Do this for all the methods where you want to implement the authorizer. Finally, click on the ‘Actions’ dropdown from the top and click on ‘Deploy API’. That’s it. Your API is now secured by Cognito Access Token verification.
Using Serverless
The Steps 1 and 2 from the above section above remain the same. Thereafter, go to your serverless.yml file and within the resources section, add an Authorizer resource.
resources:
  Resources:
    ApiGatewayAuthorizer:
      Type: AWS::ApiGateway::Authorizer
      Properties:
        AuthorizerResultTtlInSeconds: 300
        Name: cognito_auth
        # apparently ApiGatewayRestApi is a global string
        RestApiId: { "Ref" : "ApiGatewayRestApi" }
        IdentitySource: method.request.header.Authorization
        Type: COGNITO_USER_POOLS
        #Replace with your ARN
        ProviderARNs:
        - arn:aws:cognito-idp:ap-south-1:1234567890:userpool/ap-south-1_abcdefghi
Next, for each function where you want to add the authorizer, edit the event section and add the authorizer type, authorizerID (that refers to the resource created) and scope.
functions:
  my_func:
    handler: my_func.handler
    layers:
        # Ref name is generated by TitleCasing the layer name & appending LambdaLayer
      - {Ref: CommonLibsLambdaLayer}
    events:
      - http:
          path: my_path
          integration: lambda
          method: post
          cors: true
          authorizer:
            # Provide both type and authorizerId
            type: COGNITO_USER_POOLS # TOKEN or REQUEST or COGNITO_USER_POOLS, same as AWS Cloudformation documentation
            authorizerId:
              Ref: ApiGatewayAuthorizer  # or hard-code Authorizer ID
            scopes: # Optional - List of Oauth2 scopes when type is COGNITO_USER_POOLS
              - user_management_lambdas/api
Finally, deploy the lambda function. You will see the Authorizer created in API gateway, and added to the relevant methods of the functions on which the authorizer is defined in serverless.yml.
I hope you liked this article. For more tutorials on AWS, check out https://iotespresso.com/category/aws/. Also, if you are planning to become a certified AWS Solutions Architect, I’d recommend that you check out this course on Udemy. I took this course and found the lectures to be lucid, to-the-point, and fun. I hope they will help you as well.